Your browser doesn't support JavaScript api – Page 2 – Windows Programming

Timers

Timers

Timers allow an application to perform an action at regular intervals without blocking the execution of the rest of the program. A timer is created using the SetTimer() function. Once created, the timer continues to generate timer events until it is destroyed or the application terminates.

The prototype for the function is:


UINT_PTR SetTimer(HWND hWnd,UINT_PTR nIDEvent,UINT uElapse,TIMERPROC lpTimerFunc );

Parameters

hWnd
A handle to the window associated with the timer.

nIDEvent
An application-defined identifier for the timer.

uElapse
The time interval, in milliseconds, between timer events.

lpTimerFunc
A pointer to an application-defined TIMERPROC callback function. If this parameter is NULL, the system posts a WM_TIMER message to the window’s message queue whenever the timer expires. If a callback function is specified, Windows calls the callback function each time the timer expires instead of posting a WM_TIMER message.

If the function succeeds, the return value is a timer identifier. If the function fails, the return value is 0.

The SetTimer() function can also modify an existing timer. To update a timer, specify the same window handle and timer identifier. The timer interval can then be changed, and a message-based timer can be converted into a callback timer (or vice versa) by changing the lpTimerFunc parameter.

A timer is destroyed using the KillTimer() function. Its prototype is:


UINT_PTR SetTimer(HWND hWnd,UINT_PTR nIDEvent,UINT uElapse,TIMERPROC lpTimerFunc );

Parameters

hWnd
A handle to the window associated with the timer.

uIDEvent
The identifier of the timer to be destroyed.

If the function succeeds, the return value is non-zero. If the function fails, the return value is 0.

Note: Windows timers are intended for general-purpose timing and user interface tasks. They are not high-precision timers, and the interval specified by uElapse is the minimum delay before a timer event is generated. The actual interval may be longer depending on system load and the scheduling of Windows.

Example

The following short program creates a digital clock using the timer function to update the display
String Manipulation

The string manipulation functions of the Win32 API allow an application to test and manipulate the contents of a string. A selection of these is listed below. For a full list of string manipulation functions – https://docs.microsoft.com/en-us/windows/win32/menurc/string-functions

CharLower

Translates a character string to lowercase. 

LPSTR CharLower(LPSTR lpsz);

Where lpsz is a null-terminated string or specifies a single character. If the operand is a character string, the function returns a pointer to the converted string.

CharNext

Retrieves a pointer to the next character in a string. The prototype for this function is

LPSTR CharNext(LPCSTR lpsz);

Where lpsz is a character in a null-terminated string. The return value is a pointer to the next character in the string, or to the terminating null character if at the end of the string.

CharPrev

Positions pointer to the previous character in a string. 

LPSTR CharPrev(LPCSTR lpszStart,LPCSTR lpszCurrent);

where
LpszStart – The beginning of the string.
LpszCurrent – A character in a null-terminated string.
The return value is a pointer to the preceding character in the string, or to the first character in the string

CharUpper

Converts a character string to uppercase. The prototype for this function is

LPSTR CharUpper(LPSTR lpsz);

Where lpsz is a null-terminated string or a single character. If the operand is a character string, the function returns a pointer to the converted string.

IsCharAlpha

Determines whether a character is an alphabetical character.

BOOL IsCharAlpha(CHAR ch);

Where ch is the character to be tested. If the character is alphabetical, the return value is nonzero. If the character is not alphabetical, the return value is zero.

IsCharAlphaNumberic

Determines whether a character is an alphanumeric character.

BOOL IsCharAlpha(CHAR ch);

Where ch is the character to be tested. If the character is alphanumeric, the return value is nonzero. If the character is not alphanumeric, the return value is zero.

IsCharLower

Determines whether a character is lowercase.

BOOL IsCharLower(CHAR ch);

Were ch is the character to be tested. If the character is lowercase, the return value is nonzero. If the character is not lowercase, the return value is zero.

IsCharUpper

Determines whether a character is uppercase.

BOOL IsCharLower(CHAR ch);

Where ch is the character to be tested. If the character is uppercase, the return value is nonzero. If the character is not uppercase, the return value is zero.

Lstrlen

Determines the length of the specified string excluding the terminating null character.

int lstrlen(LPCSTR lpString);

Where lpString is the null-terminated string to be checked.
The function returns the length of the string, in characters.

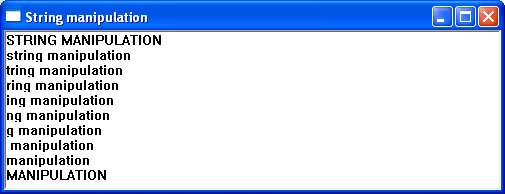
Example

The following short program demonstrates various API string manipulation functions


File Management API Functions

The Win32 API offers a set of functions for accessing and managing disk files. This is in addition to the I/O functions available as part of the C and C++ runtime libraries. A selection of these API functions is outlined below.

For further reading on the full list of file management functions 

https://docs.microsoft.com/en-us/windows/win32/fileio/file-management-functions

Creating and Opening Files

All types of files can be created and opened with the API function CreateFile(). Windows assigns a file handle to each file that is opened or created. This handle is then used to access that file. File handles are valid until closed with the CloseHandle() function, which closes the file and flushes the buffers. The prototype of this function is

HANDLE CreateFile(LPCSTR lpFileName,DWORD dwAccess,DWORD dwShareMode,LPSECURITY_ATTRIBUTES lpSecurityAttributes,DWORD dwCreationDisposition,DWORD dwFlagsAndAttributes,HANDLE hTemplateFile);

Where
lpFileName – The name of the file or device to be created or opened with a backslash (\) to separate the components of a path.
dwAccess – The requested access to the file or device, which can be summarized as read, write, both or neither
dwShareMode – read, write, both, delete, all of these, or none.
lpSecurityAttributes – determines whether the child processes can be inherited the returned handle. This parameter can be NULL.
dwCreationDisposition – An action to take on a file or device that exists or does not exist.
dwFlagsAndAttributes – file or device attributes and flag
hTemplateFile – handle to a template file that supplies file attributes and extended attributes for the file that is being created. This parameter can be NULL.

If the function succeeds, the return value is an open handle to the specified file. If the function fails, the return value is INVALID_HANDLE_VALUE

Reading From and Writing to a File

When a file is first opened, Windows places a file pointer at the start of the file. Windows then advances the file pointer after the next read or write operation. An application can also move the file pointer position with the SetFilePointer() function. An application performs read and write operations with the ReadFile() and WriteFile() API functions. The prototype of these functions are –

BOOL ReadFile(HANDLE hFile,LPVOID lpBuffer,DWORD nNumberOfBytes,LPDWORD lpNumberOfBytes,LPOVERLAPPED lpOverlapped);

BOOL WriteFile(HANDLE hFile, LPCVOID lpBuffer, DWORD nNumberOfBytes, LPDWORD lpNumberOfBytes, LPOVERLAPPED lpOverlapped );

Where
hFile – A handle to the device
lpBuffer – A pointer to the buffer that holds the data to be read or written.
nNumberOfBytes – The maximum number of bytes to be read or written.
lpNumberOfBytes – Number of bytes read or written when using a synchronous hFile parameter. 
lpOverlapped – A pointer to an OVERLAPPED structure.

If the function succeeds, the return value is nonzero.  If the function fails the return value is zero.

When the file pointer reaches the end of the file any attempts to read any further data will return an error.

Windows allows more than one application to open a file and write to it. To prevent two applications from trying to write to the same file simultaneously, an application can lock the shared file area with the LockFile() function (see below). Locking part of a file prevents other processes from reading or writing anywhere in the specified area. When the application has completed its file operations it can unlock that region of the file using the UnlockFile() function. All locked regions of a file should be unlocked before closing a file.

The code section below demonstrates the API functions ReadFile() and WriteFile() by creating and then writing to a simple text file and then reading the contents before displaying them in a messagebox

#include <windows.h>
int APIENTRY WinMain( HINSTANCE hInst, HINSTANCE hPrev, LPSTR lpCmdLine, int nCmdShow )
{
 HANDLE hFile;
// create the file.
hFile = CreateFile( TEXT("FILE1.TXT"), GENERIC_READ | GENERIC_WRITE,FILE_SHARE_READ, NULL, OPEN_ALWAYS,FILE_ATTRIBUTE_NORMAL, NULL );
if ( hFile != INVALID_HANDLE_VALUE )
{
DWORD dwByteCount;
TCHAR szBuf[64]=TEXT("/0");
// Write a simple string to hfile.
WriteFile( hFile, "This is a simple message", 25, &dwByteCount, NULL );
// Set the file pointer back to the beginning of the file.
SetFilePointer( hFile, 0, 0, FILE_BEGIN );
// Read the string back from the file.
ReadFile( hFile, szBuf, 128, &dwByteCount, NULL );
// Null terminate the string.
szBuf[dwByteCount] = 0;
// Close the file.
CloseHandle( hFile );
//output message with string if successful
 MessageBox( NULL, TEXT("File created"), TEXT(""), MB_OK );
}
else
{
//output message if unsuccessful
 MessageBox( NULL, TEXT("File not created"), TEXT(""), MB_OK );
}
 return 0;
}

CopyFile

Copies an existing file to a new file but not the security attributes. The prototype of the copyfile() API function is

BOOL CopyFile(LPCTSTR lpExistingFileName,LPCTSTR lpNewFileName,BOOL bFailIfExists);

Where
lpExistingFileName – The name of an existing file.
lpNewFileName – The name of the new file.
bFailIfExists – If this parameter is TRUE and the new file already exists the function fails. If this parameter is FALSE and the new file already exists, the function overwrites the existing file and returns true.

If the function succeeds, the return value is nonzero. If the function fails, the return value is zero.

CreateDirectory

Creates a new directory. The function applies a specified security descriptor to the new directory if the underlying file system is NTFS or one that supports security on files and directories. The prototype of this function is

BOOL CreateDirectory(LPCSTR lpPathName,LPSECURITY_ATTRIBUTES lpSecurityAttributes);

lpPathName – The path of the directory to be created
lpSecurityAttributes – A pointer to a SECURITY_ATTRIBUTES structure

Returns TRUE if successful; otherwise, the return value is FALSE.

DeleteFile

Deletes an existing file. If an application attempts to delete an open file or a file that does not exist, the function fails. The prototype of this function is

BOOL DeleteFile(LPCSTR lpFileName);

Where LpFileName is the name of the file to be deleted.  If the function succeeds, the return value is nonzero. If the function fails, the return value is zero (0).

GetFileAttributes

Retrieves file system attributes for a specified file or directory. The prototype of this function is

DWORD GetFileAttributes(LPCSTR lpFileName);

Where lpFileName is the name of the file or directory.  If the function succeeds, the return value contains the attributes of the specified file or directory. If the function fails, the return value is INVALID_FILE_ATTRIBUTES.

MoveFile

Moves an existing file or a directory to a new location on a volume. MoveFile will fail on directory moves when the destination is on a different volume. The prototype for this function is

BOOL MoveFile(LPCTSTR lpExistingFileName,LPCTSTR lpNewFileName);

LpExistingFileName – The name of the file or directory on the local computer.
LpNewFileName – The new name for the file or directory.

If the function succeeds, the return value is nonzero. If the function fails, the return value is zero.

RemoveDirectory.

Deletes the specified empty directory. The prototype of this function is

BOOL RemoveDirectory( LPCTSTR lpszDir );

Where lpszDir is a pointer to a null-terminated string that contains the path of the directory to be removed. The directory must be empty and the calling process must have delete access to the directory.  Returns true if successful; otherwise, the return value is FALSE. 

LockFile

Locks a region in an open file. The prototype for this function is

BOOL LockFile(HANDLE hFile,DWORD dwFileOffsetLow,DWORD dwFileOffsetHigh,DWORD nNumberOfBytesToLockLow,DWORD nNumberOfBytesToLockHigh);

where
hFile – A handle to the file.
dwFileOffsetLow – The low-order 32 bits of the starting byte offset in the file where the lock should begin.
dwFileOffsetHigh – The high-order 32 bits of the starting byte offset in the file where the lock should begin.
nNumberOfBytesToLockLow– The low-order 32 bits of the length of the byte range to be locked.
nNumberOfBytesToLockHigh -The high-order 32 bits of the length of the byte range to be locked.

If the function succeeds, the return value is nonzero (TRUE). If the function fails, the return value is zero (FALSE). 

UnlockFile

Unlocks a region in an open file

BOOL UnlockFile(HANDLE hFile,DWORD dwFileOffsetLow,DWORD dwFileOffsetHigh,DWORD nNumberOfBytesToUnlockLow,DWORD nNumberOfBytesToUnlockHigh);

where
hFile – A handle to the file that contains a region locked with LockFile.
dwFileOffsetLow – The low-order word of the starting byte offset in the file where the locked region begins.
dwFileOffsetHigh – The high-order word of the starting byte offset in the file where the locked region begins.
nNumberOfBytesToUnlockLow – The low-order word of the length of the byte range to be unlocked.
nNumberOfBytesToUnlockHigh – The high-order word of the length of the byte range to be unlocked.

If the function succeeds, the return value is nonzero. – If the function fails, the return value is zero.

Multiple Document Interface

Multiple-Document Interface (MDI)

The Multiple-Document Interface (MDI) allows a user to work with several documents simultaneously within a single application window. Rather than each document appearing in its own top-level window, all document windows are contained inside a single parent window known as the MDI frame window.

An MDI application must register at least two window classes:

  • One window class for the MDI frame window.
  • One window class for the MDI child windows.

At any one time, only one MDI child window is active. The active child window is displayed in front of the other child windows, and its title bar is highlighted to indicate that it currently has the input focus. Users can move, resize, minimise, maximise, or arrange the child windows independently within the MDI frame window.

Creating an MDI Application

The first step in creating an MDI application is registering the required window classes. One class defines the MDI frame window, while another defines the MDI child window. Additional child window classes may be registered if the application supports different document types.

The window class for the MDI frame window is registered in the same manner as a standard application main window. The window class for an MDI child window is similar to that of a normal child window, with two important differences:

  • An icon should be specified because MDI child windows can be minimised within the MDI frame window.
  • The menu name should be set to NULL, since MDI child windows do not own menus. Instead, the MDI frame window manages the application’s menu, automatically merging it with the system menu of the active child window when required.

Example

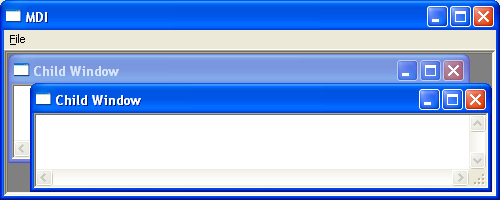
The following program demonstrates how to create a Multiple-Document Interface (MDI) application. Selecting File from the menu bar and then choosing New creates a new MDI child window. Each child window contains an edit control that allows the user to enter and edit text independently of the other open documents.


Creating a Toolbar

Toolbars can be created using the CreateWindowEx() function, specifying TOOLBARCLASSNAME as the window class name, or by using the deprecated CreateToolbarEx() function. A TBBUTTON structure contains the information describing each toolbar button. These buttons are added to the toolbar by sending the TB_ADDBUTTONS or TB_INSERTBUTTON message using the SendMessage() function. Toolbar images are stored in an image list (HIMAGELIST), which is associated with the toolbar using the TB_SETIMAGELIST message. Each toolbar button references an image in the image list through its iBitmap member. When a toolbar button is clicked, the parent window receives a WM_COMMAND message, with the button identifier stored in the low-order word of wParam.

For in-depth reading on the creation of toolbars
https://docs.microsoft.com/en-us/windows/win32/controls/toolbar-control-reference

The following short program creates a simple toolbar with two buttons using the following two images. Clicking either button will produce a message box.

Bitmaps

Windows supports two main types of bitmap: Device-Independent Bitmaps (DIBs) and Device-Dependent Bitmaps (DDBs).

A Device-Independent Bitmap (DIB) stores image data in a standardised format that is independent of the display device. Because the bitmap contains information describing its colour format and pixel layout, it can be transferred between different devices and applications without requiring conversion. DIBs are commonly used for storing bitmap images in files (such as .BMP files), copying images via the clipboard, and exchanging graphics between applications.

A Device-Dependent Bitmap (DDB) is created in a format that is optimised for a particular output device, such as a graphics display or printer. Since the bitmap is stored using the characteristics of the target device, it cannot be transferred directly between different devices without first being converted. DDBs are generally used to improve drawing performance because they are stored in a format that is efficient for the graphics device interface (GDI) to render.

For example, a bitmap stored in video memory for rapid screen drawing is typically a device-dependent bitmap, whereas a bitmap loaded from a .BMP image file is usually represented as a device-independent bitmap before being converted for display.

In practice, Windows applications often load an image as a Device-Independent Bitmap, then convert it to a Device-Dependent Bitmap when it is displayed on the screen. This approach combines the portability of DIBs with the rendering efficiency of DDBs.

Creating and Loading Device-Independent Bitmaps

Device-independent bitmaps are typically created using an image editor. To load a bitmap for use in an application use the LoadImage() function. This supersedes the LoadBitmap() function. The prototype for this function is

HANDLE LoadImage(HINSTANCE hInst, LPCSTR name, UINT type, int cx, int cy, UINT fuLoad);

Where
hInst – is a handle to the module of either a DLL or executable (.exe) that contains the image to be loaded.
name – the image to be loaded.
UINT – The type of image to be loaded.
cx – The width, in pixels, of the icon or cursor.
cy– The height, in pixels, of the icon or cursor.
fuLoad – can be one of the following values: LR_CREATEDIBSECTION; LR_DEFAULTCOLOR;LR_DEFAULTSIZE; LR_LOADFROMFILE; LR_LOADMAP3DCOLORS; LR_LOADTRANSPARENT; LR_MONOCHROME; LR_SHARED; LR_VGACOLOR

If the function succeeds, the return value is the handle of the newly loaded image. If the function fails, the return value is NULL.

For further reading
https://docs.microsoft.com/en-us/windows/win32/api/winuser/nf-winuser-loadimagea

To convert a DIB to a DDB, use the API function CreateDIBitmap. 
https://docs.microsoft.com/en-us/windows/win32/api/wingdi/nf-wingdi-createdibitmap

Displaying Bitmaps

To display a bitmap using the Windows Graphics Device Interface (GDI), two device contexts (DCs) are typically used. The first is the window device context, which represents the drawing surface of the application window. The second is a memory device context, which is an off-screen drawing surface used to temporarily hold the bitmap before it is copied to the window.

The memory device context is created by calling the CreateCompatibleDC() function. This function creates a device context that is compatible with an existing device context, allowing graphics to be prepared in memory before being displayed on the screen. Drawing to a memory device context rather than directly to the window helps reduce flickering and improves drawing performance.

Once the memory device context has been created, the bitmap is selected into it using the SelectObject() function. This associates the bitmap with the memory device context, making it the current drawing surface for that DC.

Finally, the bitmap is copied from the memory device context to the window device context using the BitBlt() (Bit Block Transfer) function. BitBlt() efficiently transfers a rectangular block of pixels from one device context to another, displaying the bitmap in the application window.

The typical sequence of operations is:

  1. Obtain the window’s device context using BeginPaint() or GetDC().
  2. Create a compatible memory device context using CreateCompatibleDC().
  3. Load or create a bitmap.
  4. Select the bitmap into the memory device context using SelectObject().
  5. Copy the bitmap to the window using BitBlt().
  6. Restore the original object in the memory device context.
  7. Delete the memory device context using DeleteDC().
  8. Release the window device context using EndPaint() or ReleaseDC().

DC=GetDC(hwnd);
memDC=CreateCompatibleDC(DC);
SelectObject(memDC,bitmap1);
BitBlt(DC,x.y,cx,cy, memdc,x1,y1,SRCCOPY);

The syntax for the CreateCompatibleDC function is

HDC CreateCompatibleDC(HDC hdc);

Where hdc is a handle to an existing DC. If this handle is NULL, the function creates a memory DC compatible with the application’s current screen. If the function succeeds, the return value is the handle to a memory DC. If the function fails, the return value is NULL.

The syntax for this Bitblt() copy function is

BOOL BitBlt(HDC hdc,int x,int y,int cx, int cy,HDC hdcSrc,int x1,int y1,DWORD rop);

where
hdc – handle to the destination device context.
x – The x-coordinate upper-left corner of the destination rectangle.
y – The y-coordinate of the upper-left corner of the destination rectangle.
cx – The width of the source and destination rectangles.
cy – The height, in logical units, of the source and the destination rectangles.
HdcSrc – A handle to the source device context.
x1 – The x-coordinate of the upper-left corner of the source rectangle.
y1 – The y-coordinate of the upper-left corner of the source rectangle.
rop – A raster-operation code. Define how the colour data for the source rectangle will be combined with the destination rectangle. The ‘vanilla’ operating code SRCCOPY will copy the source rectangle directly onto the destination rectangle. For additional raster code information see the link below

Bltbmp returns zero if successful and non-zero otherwise.

When a bitmap is no longer needed it must be destroyed using the DeleteObject() API function.

For further information 
https://docs.microsoft.com/en-us/windows/win32/api/wingdi/nf-wingdi-bitblt

Repainting the Screen Using Device Dependent Bitmaps

One technique for preserving the contents of a window during repaint operations is to use a device-dependent bitmap (DDB) as an off-screen drawing surface. Instead of drawing graphics directly to the window, all drawing operations are performed on a bitmap stored in memory. This bitmap acts as a back buffer or virtual drawing surface that maintains a copy of the window’s contents.

The bitmap is associated with a memory device context, created using the CreateCompatibleDC() function. All graphics are drawn to this memory device context, ensuring that the bitmap always contains an up-to-date representation of the client area.

Whenever Windows generates a repaint request, such as after the window has been resized, uncovered, or restored, the application does not need to redraw every graphical object individually. Instead, it simply copies the contents of the memory bitmap to the window’s device context using the BitBlt() function. This process is considerably faster than recreating the entire display and helps eliminate screen flicker.

The sequence of operations is as follows:

  1. Create a memory device context using CreateCompatibleDC().
  2. Create a compatible bitmap using CreateCompatibleBitmap().
  3. Select the bitmap into the memory device context using SelectObject().
  4. Perform all drawing operations on the memory device context.
  5. When a WM_PAINT message is received, copy the bitmap from the memory device context to the window device context using BitBlt().
  6. Delete the bitmap and memory device context when they are no longer required.

This technique is commonly referred to as double buffering. By drawing graphics off-screen and then copying the completed image to the display in a single operation, applications can produce smoother graphics, reduce flickering, and improve repaint performance. Although modern graphics frameworks often provide built-in double buffering, this remains an important technique in traditional Win32 GDI programming.

Creating Device-Dependent Bitmaps

The API function CreateCompatibleBitmap() creates a bitmap compatible with the current device context handle. This function is best used for creating colour bitmaps. The prototype of this API function is 

HBITMAP CreateCompatibleBitmap (hdc, cx, cy) ;

Where 
hdc is a handle to a device context
cx is the bitmap width, in pixels
cy is the bitmap height, in pixels. 

If the function succeeds, the return value is a handle to the compatible bitmap (DDB). If the function fails, the return value is NULL.

In addition, a Windows application can also create a device-dependent bit using the CreateBitmap API function. This function is best used for creating monochrome bitmaps. The syntax for this function is

HBITMAP CreateBitmap(int nWidth,int nHeight,UINT nPlanes,UINT nBitCount,const VOID *lpBits);

where
nWidth – The bitmap width, in pixels.
nHeight – The bitmap height, in pixels.
nPlanes – The number of colour planes used by the device.
nBitCount – The number of bits required to identify the colour of a single pixel.
lpBits – Set the colours in a rectangle of pixels. 

If the function succeeds, the return value is a handle to a bitmap. If the function fails, the return value is NULL.

Example

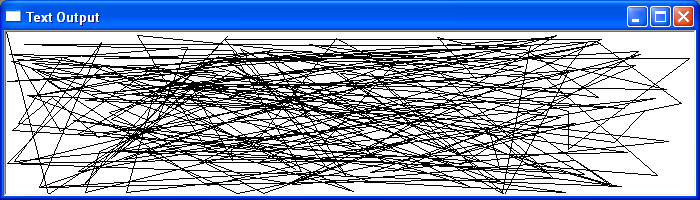
In the code section below, Windows creates a device context of the application window and a compatible device context. The application then creates and fills this virtual copy with 200 random lines. Each time a repaint request is received, the contents of the virtual window are copied to the screen device context by the BitBlt function.


Copying a Bitmap Using the StretchBlt Function

The StretchBlt() function copies a bitmap from a source device context to a destination device context while automatically scaling the image to fit the specified destination rectangle. Depending on the size of the destination rectangle, the bitmap can either be enlarged (stretched) or reduced (compressed).

Unlike the BitBlt() function, which performs a direct pixel-for-pixel copy, StretchBlt() resizes the bitmap during the transfer. This makes it useful for displaying images at different sizes or fitting graphics within a resizable application window.

In the example below, the application captures the current contents of the Windows desktop by creating a bitmap that is compatible with the screen’s device context. The desktop image is copied into a memory device context and then displayed within the application’s client area using the StretchBlt() function. The captured image is automatically scaled to fit the dimensions of the application window.

The screen capture is initiated when the user clicks the left mouse button anywhere within the client area of the application window. After the image has been captured, the application repaints the window using the scaled bitmap whenever a repaint request is received.

The basic sequence of operations is as follows:

  1. Obtain the screen device context using GetDC(NULL).
  2. Create a compatible memory device context using CreateCompatibleDC().
  3. Create a compatible bitmap using CreateCompatibleBitmap().
  4. Copy the desktop image into the memory device context using BitBlt().
  5. Respond to the WM_PAINT message by calling StretchBlt() to copy and scale the bitmap into the application’s client area.
  6. Release all GDI resources, including the bitmap and memory device context, when they are no longer required.

Note: StretchBlt() performs image scaling using the current stretch mode set by SetStretchBltMode(). Higher-quality scaling modes, such as HALFTONE, are available on modern versions of Windows, although older development environments such as Visual C++ 6.0 typically use the default COLORONCOLOR mode.

Example

In the example below, the application captures the current contents of the Windows desktop by creating a bitmap of the screen. When the user clicks the left mouse button anywhere within the application’s client area, the screen image is copied into a memory bitmap. The bitmap is then displayed in the application window using the StretchBlt() API function, which automatically scales the captured image to fit the dimensions of the client window.

Common Dialog Box

The Common Dialog Box Library

The Common Dialog Box Library provides a collection of predefined Windows dialog boxes for performing frequently used tasks. These standard dialogs offer a consistent user interface across Windows applications, allowing users to interact with familiar controls regardless of the application they are using.

The library includes dialog boxes for:

  • Opening files
  • Saving files
  • Choosing a printer
  • Finding and replacing text
  • Selecting fonts
  • Choosing colours
  • Displaying help information (legacy)

Using the common dialog boxes helps ensure that an application follows the standard Windows look and feel, improving usability and reducing the amount of code that developers need to write and maintain.

The functions and data structures used by the Common Dialog Box Library are declared in the COMMDLG.H header file. To use these dialogs, an application typically performs the following steps:

  1. Declare and initialise the appropriate dialog box structure (for example, OPENFILENAME, CHOOSECOLOR, or CHOOSEFONT).
  2. Set the required fields of the structure, such as the owner window, filters, initial directory, or default values.
  3. Pass a pointer to the structure to the appropriate common dialog function.
  4. When the user closes the dialog box, the function returns control to the application. If the user confirms the operation, the structure contains the information selected or entered by the user.

Each common dialog function returns a value indicating whether the user completed the operation successfully or cancelled the dialog, allowing the application to respond accordingly.

For further reading https://docs.microsoft.com/en-us/windows/win32/dlgbox/dialog-box-types

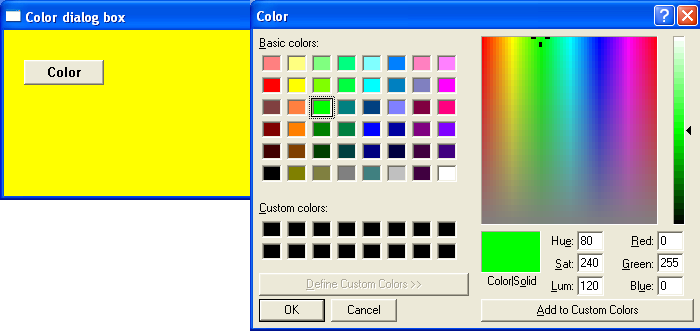
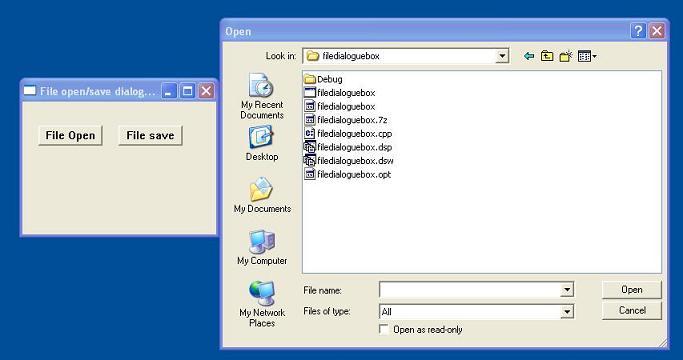
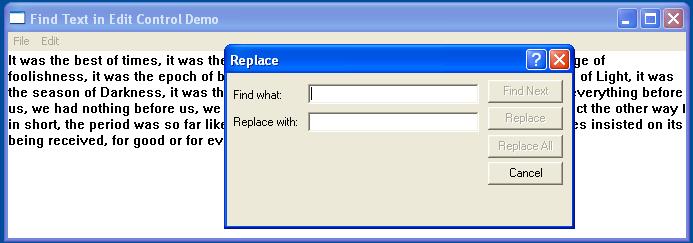
The examples below demonstrate 3 common dialog boxes: text find and replace, the file open and save and colour select. 


Select Colour Common Dialog Box

The Select Colour Dialog Box displays a basic set of available colours in addition to allowing a user to create custom colours by specifying RGB values


File Open/Save Common Dialog Box 

The ‘Common File-Open/Save’ dialog offers a consistent way to deal with file management operations, using the standard dialog interface that Windows users should be familiar with.

The Open dialog box lets the user specify the drive, directory, and the name of a file or set of files to open.

The Save As dialog box lets the user specify the drive, directory, and name of a file to save.


Find Common Dialog Box

The Find and Replace Common Dialog Box displays a modeless dialog box that allows the user to specify a string to search for within a text document, as well as additional options for text editing


Font Common Dialog Box

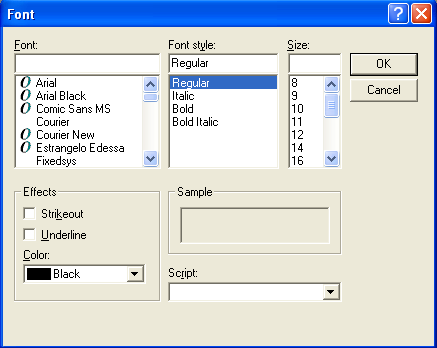
Allows the user to select a font, style, size, and optional text effects using the standard Windows Font dialog.


Choose Printer Common Dialog Box

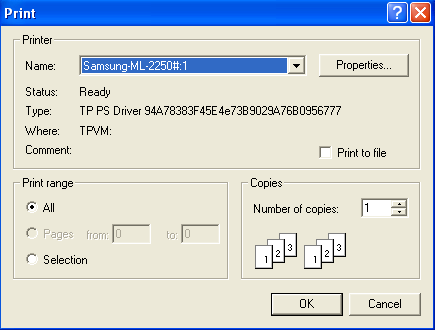
Printer Common Dialog Box – Displays the standard Windows Print dialog, allowing the user to select a printer, choose the number of copies, and specify print options before printing.

The Dialog Box

A dialog box is a temporary pop-up window that prompts the user for additional information or requests input before an application can continue with a task. Dialog boxes are commonly used to display settings, collect user input, confirm actions, or present important messages.

Dialog boxes are typically created using a dialog editor and defined within a program’s resource file (.rc). A dialog box usually contains one or more controls (child windows), such as buttons, edit boxes, check boxes, radio buttons, list boxes, and combo boxes, allowing the user to enter data, choose options, or control the application’s behaviour.

In addition to user-defined dialog boxes, Windows provides several predefined dialog boxes for common tasks, including selecting colours, opening or saving files, choosing fonts, and printing documents.

Modal v Modeless Dialogue Box

A modeless dialog box allows the user to continue interacting with other windows in the application while the dialog box remains open. It stays on the screen until it is explicitly closed by the user or the application.

Typical uses include:

  • Find and Replace windows
  • Toolboxes
  • Formatting palettes
  • Search panels

Modeless dialog boxes are commonly created using the CreateDialog() function

A modal dialog box requires the user to respond before returning to the main application window. While the dialog box is open, the user cannot interact with other application windows. The dialog box must be closed before work can continue.

Typical uses include:

  • Save confirmation dialogs
  • Error and warning messages
  • File Open and Save dialogs
  • Application settings that must be completed before proceeding

Modal dialog boxes are commonly created using the DialogBox() function.

Creating a Modeless Dialog Box

Modeless dialog boxes are created using the API function CreateDialog(). The syntax is below

hDlgModeless = CreateDialog (hInstance, lpTemplate, hWndParent, lpDialogFunc) ;

hInstance – A handle to the current application.
lpTemplate – specifies the resource identifier of the dialog box template.
hWndParent – A handle to the parent window that owns the dialog box.
lpDialogFunc – A pointer to the dialog box procedure.

Return value – If the function succeeds, the return value is the dialog box handle. If the function fails, the return value is NULL.

Deactivating a Modeless Dialog Box

To destroy the modeless dialog box, use the DestroyWindow() function.

BOOL DestroyWindow(HWND hWnd);

Where HWnd is a handle to the window to be destroyed.  If the function succeeds, the return value is nonzero. If the function fails, the return value is zero.

Creating a Modal Dialog Box

Modal dialog boxes are created using the APO function DialogBox(). The syntax is

void DialogBox(hInstance,lpTemplate,hWndParent,lpDialogFunc);

hInstance – A handle to the current application.
lpTemplate – Specifies the resource identifier of the dialog box template.
hWndParent – A handle to the parent window that owns the dialog box.
lpDialogFunc – A pointer to the dialog box procedure.

Deactivating a Modal Dialog Box

To deactivate and close a modal dialogue box use the EndDialog() API function call. The syntax of this function is

BOOL EndDialog(HWND hDlg,INT_PTR nResult);

HDlg – A handle to the dialog box to be destroyed.
nResult – The value to be returned to the application from the function that created the dialog box.

Return value – If the function succeeds, the return value is nonzero. If the function fails, the return value is zero.

Processing Dialog Messages

Like a standard window, each dialog box has its own dialog procedure (also called a dialog callback function) that receives and processes Windows messages.

Example

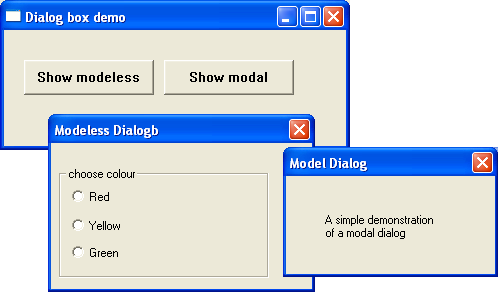
The code example demonstrates a modal and modeless dialog box. The modal dialog box displays a simple message. The modeless dialog box has 3 radio buttons. Selecting any of the radiobutton changes the background colour of the parent window.

dialog demo image

Property Sheets

A property sheet is a modeless dialog box used to display and edit the properties or settings of an object. It consists of one or more property pages, with each page displayed under its own selectable tab, allowing related settings to be organised into logical groups. Users can switch between tabs without closing the dialog, making it easy to view and modify multiple categories of options. Property sheets are commonly used in Windows applications for configuration dialogs and object properties.


For further reading https://docs.microsoft.com/en-us/windows/win32/controls/property-sheet-reference

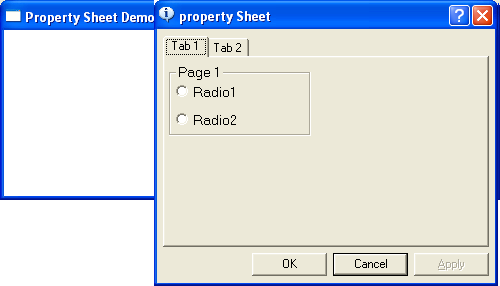
The following short program displays a property sheet containing 2 pages when the user right mouse clicks. The first page responds to a radio button click by displaying an associated message box. The 2nd page is for display purposes only. Although this simple demonstration does not set any real properties it shows how to create a property page template.


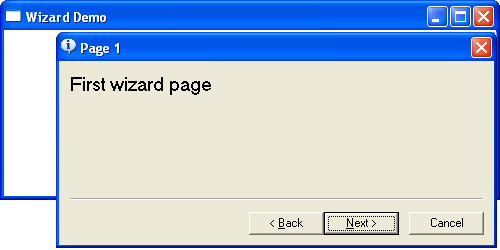
A property sheet can also be used to create a wizard. A wizard consists of a set of dialog boxes for guiding a user through a set of selection options in sequence.

wizard control picture


The following short program displays a simple wizard that contains 3 property pages. Right-clicking anywhere in the window initiates the wizard.


Dialog-Based Applications

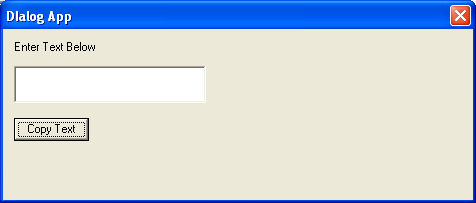
A dialog-based application is a Windows application in which the main window is a dialog box rather than a standard application window. This approach simplifies the development process by allowing controls such as buttons, edit boxes, check boxes, and list boxes to be placed visually on the window using the Resource Editor provided by the development environment.

The behaviour of the dialog box is controlled by a dialog procedure, which processes messages generated by the dialog box and its controls. For example, the dialog procedure can respond to button clicks, edit box input, and other user interactions.

Dialog-based applications require considerably less code than traditional Win32 applications because much of the window creation and message handling is managed automatically by the Windows dialog manager. As a result, they are particularly well suited to small utilities, configuration programs, and applications with simple user interfaces.

Although dialog-based applications are easy to develop, they are generally less flexible than traditional frame-window applications and are therefore best suited to relatively straightforward applications.

Example

The following example demonstrates a simple dialog-based application. The main window is implemented as a dialog box containing an edit box, a button, and a static text control. The user enters text into the edit box and clicks the button to change the title (caption) of the dialog box to the text entered. This example illustrates how a dialog procedure processes control events and updates the dialog box in response to user actions.


Displaying Graphics

In addition to displaying text, most Windows applications make extensive use of graphics to present information visually. The Windows Graphics Device Interface (GDI) provides a comprehensive set of drawing functions that enable applications to render lines, curves, geometric shapes, bitmaps, icons and other graphical objects on the screen, printer or other output devices.

The GDI drawing functions operate using simple geometric primitives. More complex illustrations can be created by combining these primitives, allowing applications to construct everything from simple diagrams and charts to sophisticated user interfaces.

The appearance of graphical objects is determined by the current drawing attributes selected into the device context. In particular, pens define the colour, style and thickness of outlines, while brushes determine the colour and pattern used to fill enclosed shapes. Applications may also select fonts, bitmaps and other graphical objects to customise the appearance of their output.

As with text output, graphical drawing should normally be performed while processing the WM_PAINT message. This ensures that the application’s graphical output is automatically restored whenever the window requires repainting.

Windows provides a wide range of graphics functions, some of the most commonly are listed below:


Drawing Pixels

A pixel is the smallest image element that can be represented on screen. To draw a point within the client area of a window use the API function SetPixel(). The prototype for this function is

COLORREF SetPixel(HDC hdc,int x,int y,COLORREF color);

Where
hdc – the device context.
X – The x-coordinate, in logical units, of the point to be set.
Y – The y-coordinate, in logical units, of the point to be set.
Colour – is a COLORREF to paint the point. If the colour cannot be created on the video display, Windows will use the nearest pure non-dithered colour and then return that value from the function.

If the function is successful, the return value is the RGB colour. If the function fails, the return value is -1.


Drawing Lines

The LineTo() function draws a line within the client area from the current graphics drawing point. The prototype for this function is:

BOOL LineTo(HDC hdc, int x, int y);

where
hdc – the device context.
x – specifies the x-coordinate of the line’s ending point.
y – specifies the y-coordinate of the line’s ending point. 

If the function succeeds, the return value is nonzero. If the function fails, the return value is zero. The new starting point will then become the endpoint of the previous line.


MoveToEx

The initial starting position for graphics output will be the screen coordinate position 0,0. MoveToEx() is a Win32 GDI drawing function used to set the current drawing position in a device context.

The prototype for the MoveToEx function is:

BOOL MoveToEx(HDC hdc,int x,int y,LPPOINT lppt);

where
hdc – handle to a device context.
x – specifies the x-coordinate of the new position, in logical units.
y – specifies the y-coordinate of the new position, in logical units.
Lppt – is a pointer to a POINT structure that receives the previous current position.

If the function succeeds, the return value is nonzero. If the function fails, the return value is zero.


GetCurrentPosition

Retrieves the current logical graphics starting position.  The prototype of this function is:

BOOL GetCurrentPositionEx(HDC hdc,LPPOINT lppt);

Where
hdc – handle to the device context
lppt – is a pointer to a POINT structure that receives the logical coordinates of the current position. 

If the function succeeds, the return value is nonzero. If the function fails, the return value is zero.


Drawing Rectangles

The simplest function for drawing rectangles is Rectangle(). It draws a rectangle using the current pen and brush. The prototype is:

BOOL Rectangle(HDC hdc,int left,int top,int right,int bottom);

hdc – is a handle to the device context.
Left – is the x-coordinate of the upper-left corner of the rectangle.
Top – is the y-coordinate of the upper-left corner of the rectangle.
Right – the x-coordinate of the lower-right corner of the rectangle.
Bottom – the y-coordinate of the lower-right corner of the rectangle.
If the function succeeds, the return value is nonzero. If the function fails, the return value is zero.

To display rectangles with rounded corners using the API function RoundRect(). The prototype for this function is

BOOL RoundRect(HDC hdc, int left,int top,int right,int bottom,int width,int height);

where
hdc – A handle to the device context.
Left – The x-coordinate of the upper-left corner of the rectangle.
Top– The y-coordinate of the upper-left corner of the rectangle.
Right – The x-coordinate of the lower-right corner of the rectangle.
Bottom – The y-coordinate of the lower-right corner of the rectangle.
Width – The width, of the ellipse used to draw the rounded corners.
Height – The height of the ellipse used to draw the rounded corners.

If the function succeeds, the return value is nonzero.If the function fails, the return value is zero.


Drawing an Ellipse

To draw an ellipse or circle using the current pen and filled by the current brush, use the Ellipse() function. The prototype is:

BOOL Ellipse(HDC hdc,int left,int top,int right,int bottom);

where
hdc – A handle to the device context.
left – is the x-coordinate of the upper-left corner of the bounding rectangle.
Top – is the y-coordinate of the upper-left corner of the bounding rectangle.
Right – is the x-coordinate of the lower-right corner of the bounding rectangle.
Bottom – is the y-coordinate of the lower-right corner of the bounding rectangle.

If the function succeeds, the return value is nonzero.  If the function fails, the return value is zero.

To draw a circle, the bounding rectangle must be a square. For example, to draw a circle that has a centre (50,50) with a radius of 10, use the following function parameters – Ellipse(hdc,10,10,50,50);


Drawing a Semi-Circular Wedge

To draw a semi-circular wedge using the current pen and fill it with the current brush, use the API function Pie(). The prototype of this function is

BOOL Pie(HDC hdc,int left,int top,int right,int bottom,int xr1,int yr1, int xr2,int yr2);

where
hdc – A handle to the device context.
Left – The x-coordinate of the upper-left corner of the bounding rectangle.
Top – The y-coordinate of the upper-left corner of the bounding rectangle.
Right – The x-coordinate of the lower-right corner of the bounding rectangle.
Bottom – The y-coordinate of the lower-right corner of the bounding rectangle.
xr1 – The x-coordinate of the endpoint of the first radial.
yr1 -The y-coordinate of the endpoint of the first radial.
xr2 – The x-coordinate of the endpoint of the second radial.
yr2 – The y-coordinate of the endpoint of the second radial.

If the function succeeds, the return value is nonzero. If the function fails, the return value is zero.


Drawing a Chord

A chord is the region bounded by an elliptical arc and the straight line joining the arc’s start and end points.. To draw a Chord using the current pen and fill it using the current brush, use the API function Chord(). The prototype of this function is –

BOOL Chord( HDC hdc,int x1,int y1,int x2,int y2,int x3,int y3,int x4, int y4);

hdc – handle to the device context.
x1 – The x-coordinate of the upper-left corner of the bounding rectangle.
y1 – The y-coordinate of the upper-left corner of the bounding rectangle.
x2 – The x-coordinate of the lower-right corner of the bounding rectangle.
y2 – The y-coordinate of the lower-right corner of the bounding rectangle.
x3 – The x-coordinate of the endpoint of the radial defining the beginning of the chord.
y3 – The y-coordinate of the endpoint of the radial defining the beginning of the chord.
x4 – The x-coordinate of the endpoint of the radial defining the end of the chord.
y4 – The y-coordinate of the endpoint of the radial defining the end of the chord.

If the function succeeds, the return value is nonzero. If the function fails, the return value is zero


Drawing Polygons

The Polygon() function draws a closed shape made from multiple connected lines. The interior of the shape is filled using the current brush, and the border is drawn using the current pen.

Unlike Polyline(), Polygon() automatically closes the shape by drawing a line from the last point back to the first.

BOOL Polygon(HDC hdc,const POINT *apt,int cpt);

hdc – A handle to the device context.
apt – A pointer to an array of POINT structures that specify the vertices of the polygon
cpt – The number of vertices in the array. This value must be greater than or equal to 2.

If the function succeeds, the return value is nonzero.  If the function fails, the return value is zero.#


Bézier Curves

A Bézier curve is a smooth mathematical curve defined by a set of control points. Rather than specifying every point on the curve, the programmer specifies a small number of points, and Windows calculates the smooth curve that passes through the start and end points while being influenced by the intermediate control points. The PolyBezier() function draws one or more Bézier curves. The prototype of this function is

BOOL PolyBezier(HDC hdc,const POINT *apt,DWORD cpt);

where
hdc – A handle to a device context.
apt – A pointer to an array of POINT structures that contain the endpoints and control points of the curve(s), in logical units.
cpt – The number of points in the lppt array. This value must be one more than three times the number of curves to be drawn.

If the function succeeds, the return value is nonzero.  If the function fails, the return value is zero.

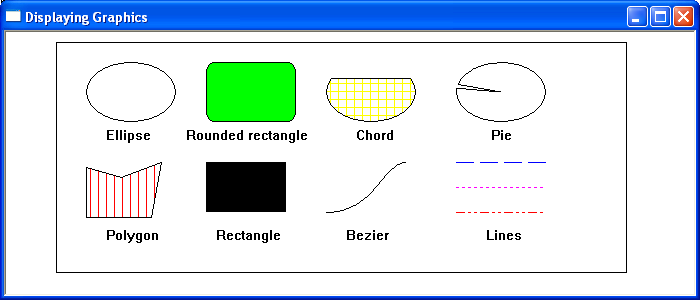
Example

The following code builds on the basic window to display Windows graphics

displaying graphics image

The Windows Message Box

A message box displays a simple message to the user but may include some selection options. They are typically used to inform the user that an event has taken place. To create a message box use the API function call MessageBox. The prototype for this function is

int MessageBox(HWND hWnd,LPCTSTR lpText,LPCTSTR lpCaption,UINT uType);

where
hWnd – is a handle to the owner window of the message box to be created. If this parameter is NULL, the message box has no owner window.
LpText – The message to be displayed.
LpCaption – Contains dialog box title. If this parameter is NULL, the default title is Error
UType – defines the contents and behaviour of the dialog box and will be a combination of a number of  different flag value but some of the more common values are

 MB_ABORTRETRYIGNORE- The message box contains three pushbuttons: Abort, Retry, and Ignore.
MB_ICONEXCLAMATION-An exclamation-point icon appears in the message box.
MB_ICONERROR-A stop-sign icon appears in the message box.
MB_ICONINFORMATION – An icon consisting of a lowercase letter i in a circle appears in the message box.
MB_ICONQUESTION-A question-mark icon appears in the message box
MB_ICONSTOP- A stop-sign icon appears in the message box.
MB_OK – The message box contains one pushbutton: OK. This is the default.
MB_OKCANCEL – The message box contains two push buttons: OK and Cancel.
MB_RETRYCANCEL – The message box contains two push buttons: Retry and Cancel.
MB_YESNO – The message box contains two push buttons: Yes and No.
MB_YESNOCANCEL – The message box contains three pushbuttons: Yes, No, and Cancel.

The return value will depend on the type of message box selected but will be one of the following: IDABORT, IDCANCEL, IDCONTINUE, IDIGNORE, IDNO, IDOK, IDRETRY, IDYES

For further detailed reading
https://docs.microsoft.com/en-us/windows/win32/api/winuser/nf-winuser-messagebox

The following short program displays a very simple message box

#include <windows.h>
int APIENTRY WinMain( HINSTANCE hInst, HINSTANCE hPrev, LPSTR lpCmdLine, int nCmdShow )
{
    MessageBox( NULL, "Hello, World!", "Hi!", MB_OK );
    return 0;
}