Your browser doesn't support JavaScript api – Page 3 – Windows Programming

Displaying Text

Basic Text Output

Two popular text printing functions are TextOut() and DrawText().

The prototypes are as follows –

BOOL TextOut(HDC hdc, int x,int y,LPCSTR lpString,int slength);

where
hdc – A handle to the device context.
– horizontal location.
y – vertical location.
lpString – pointer to a character string.
slength – is the number of characters in the string to be displayed

If the function succeeds, the return value is nonzero. If the function fails, the return value is zero.

int DrawText( HDC hdc,LPCTSTR lpString,int nCount,LPRECT lpRect,UINT uFormat);

where
hdc – A handle to the device context.
lpString – A pointer to the string that specifies the text to be drawn. If the nCount parameter is -1, the string must be null-terminated.
nCount – The length, in characters, of the string
lpRect – A pointer to a RECT structure containing the rectangle (in logical coordinates) in which the text is formatted.
uFormat – The method of formatting the text.

If the function succeeds, the return value is the height of the text in logical units. If the function fails, the return value is zero

Creating Custom Fonts

In addition to a small variety of built-in fonts, Windows also allows the creation of custom-built fonts. To create a custom font use the CreateFont() win32 API function.  The syntax for the CreateFont function is

HFONT CreateFont(int cHeight,int cWidth,int cEscapement,int cOrientation,int cWeight,DWORD bItalic,DWORD bUnderline,DWORD bStrikeOut,DWORD iCharSet,DWORD iOutPrecision,DWORD iClipPrecision,DWORD iQuality,DWORD iPitchAndFamily,LPCSTR pszFaceName);

If successful the CreateFont returns a handle to the font created. If the function fails, the return value is NULL.  Any created font must be deleted before the application terminates. In order to delete the font use the DeleteObject() function.

For a more detailed explanation of font creation – https://docs.microsoft.com/en-us/windows/win32/gdi/font-creation-and-selection

Before any graphics object can be used it is ‘selected’ into the current device context (DC). The new object will then replace the previous graphic object of the same type.

Setting Text Background and Text Colour

The Windows API functions SetTextColor() and SetBkColorTo() are used to set the text and text background colour. The syntax for these two are

COLORREF SetTextColor(HDC hdc,COLORREF color); COLORREF SetBkColor(HDC hdc,COLORREF color);

Where hdc refers to the device context and colour is used to specify an RGB value.  If the function succeeds, the return value is a colour reference to the previous text colour.

TextMetrics

The textmetric structure describes the attributes of a given font and enables an application to work with text with different font attributes. The API function GetTextMetrics() is used to get information about the current font. The syntax of this function is –

BOOL GetTextMetrics(HDC hdc,LPTEXTMETRIC lptm);

Where hdc is a handle to the device context and lptm is a pointer to the TEXTMETRIC structure that receives the text metrics.

If the function succeeds, the return value is nonzero.  If the function fails, the return value is zero.

The textmetric structure is defined as follows –

TypeDef struct TEXTMETRIC{ tmHeight As Long //height of font tmAscent As Long //height above baseline tmDescent As Long //length of descender tmInternalLeading As Long //space above character tmExternalLeading As Long //blank space above rows tmAveCharWidth As Long //average width tmMaxCharWidth As Long //maximum width tmWeight As Long //weight tmOverhang As Long //extra width added to special font tmDigitizedAspectX As Long //horizontal aspect tmDigitizedAspectY As Long //vertical aspect tmFirstChar As Byte //first character in font tmLastChar As Byte //last character in font tmDefaultChar As Byte //dafault character tmBreakChar As Byte //character used to break words tmItalic As Byte //non zero if italic tmUnderlined As Byte //non zero if underlined tmStruckOut As Byte //non zeri is struckout tmPitchAndFamily As Byte //pitch and family of font tmCharSet As Byte //character set identifier }End Type

For more information 
https://docs.microsoft.com/en-gb/windows/win32/api/wingdi/ns-wingdi-textmetrica

Character Spacing and Creating Multi-line Text

Since the characters in a non-monospaced typeface do not occupy the same amount of horizontal space on a line, it is necessary for an application to know the length of a string when outputting consecutive lines of text. Because Windows does not keep track of the current output location, an application must determine where any previously output text ended.

To provide this information, the Windows API includes the function GetTextExtentPoint32(), which calculates the width and height of a string when drawn using the currently selected font.

The syntax of this function is:

BOOL GetTextExtentPoint32(HDC hdc,LPCSTR lpString,int len,LPSIZE lpsize);

where
hdc – A handle to the device context.
lpString – holds the string used for the length calculation.
len – length of the string lpString.
lpsize – A pointer to a SIZE structure that returns the width or height of the string (see below)

If the function succeeds, the return value is nonzero.  If the function fails, the return value is zero.

The prototype for the size structure is

typedef struct tagSIZE {LONG cx;LONG cy;} SIZE;

Upon return, the CX field will contain the length of the string and the CY will contain the height of the string.

Example

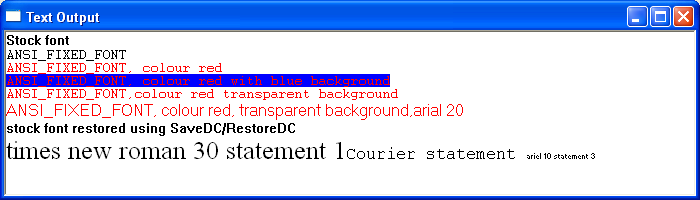
The following short program demonstrates various stock and user-defined fonts and other aspects of font formatting

text output image

ScrollBar Control

Scrollbars differ from other controls by passing information to the parent windows by use of the WM_VSCROLL and WM_HSCROLL messages.

When processing these scroll bar messages, the value of the LOWORD (wparam) indicates what action the scrollbar has taken while the lParam parameter enables the application to identify the type of scroll bar. A value of zero indicates a windows scrollbar and any other value holds the handle of the scroll bar control.

The most common scrollbar messages are

SB_LINEUP – is sent when the scrollbar moves up one position
SB_LINEDOWN – is sent when the scrollbar moves down one position
SB_PAGEUP – is sent when the scrollbar is moved up one page
SB_PAGEDOWN – is sent when the scrollbar is moved down one page
SB_LINELEFT – is sent when the scrollbar is moved left one position
SB_LINERIGHT – is sent when the scrollbar is moved right one position
SB_PAGELEFT – is sent when the scrollbar is moved one page left
SB_PAGERIGHT – is sent when the scrollbar is moved one page right
SB_THUMBPOSITION – is sent after the thumbbar is dragged to a new position
SB_THUMBTRACK – is sent while the thumbbar is dragged to a new position

The following API functions can be used to get and set additional scrollbar information

GetScrollInfo() – retrieves the parameters of a scroll bar, including the minimum and maximum scrolling positions, the page size, and the position of the scroll box (thumb). The prototype of this function is

BOOL GetScrollInfo(HWND hwnd,int nBar,LPSCROLLINFO lpsi);

If the function does not retrieve any values, the return value is zero else the return value is non-zero.

SetScrollInfo() – the SetScrollInfo function sets the parameters of a scroll bar, including the minimum and maximum scrolling positions, the page size, and the position of the scroll box (thumb). The function also redraws the scroll bar, if requested.  The prototype of this function is

int SetScrollInfo(HWND hwnd,int nBar,LPCSCROLLINFO lpsi,BOOL redraw);

Where

hwnd – handle to a scroll bar control or a window with a standard scroll bar.
nBar – Specifies the type of scroll bar for which to retrieve parameters. This parameter can be one of the following values
   SB_CTL – Retrieves the parameters for a scroll bar control. 
   SB_HORZ – Retrieves the parameters for the window’s standard horizontal scroll bar.
   SB_VERT – Retrieves the parameters for the window’s standard vertical scroll bar.
lpsi – Pointer to a SCROLLINFO structure(see below).
redraw – Specifies whether the scroll bar is redrawn to reflect any changes. Only relevant when setting scrollbar values.

The return value is the current position of the scroll box. where the parameters

The SCROLLINFO structure contains scroll bar parameters to be set by the SetScrollInfo function or retrieved by the GetScrollInfo function

typedef struct tagSCROLLINFO {UINT cbSize;UINT fMask;int  nMin; int  nMax; UINT nPage; int  nPos; int  nTrackPos;} SCROLLINFO, *LPSCROLLINFO;

cbSize – specifies the size of the SCROLLINFO structure.
fMask – specifies the scroll bar parameters to set or retrieve. This can be a combination of the following values:

 SIF_ALL – Combination of SIF_PAGE, SIF_POS, SIF_RANGE, and SIF_TRACKPOS.
SIF_DISABLENOSCROLL – This value is used only when setting a scroll bar’s parameters. If the scroll bar’s new parameters make the scroll bar unnecessary, disable the scroll bar instead of removing it.
SIF_PAGE – The nPage member contains the page size for a proportional scroll bar.
SIF_POS – The nPos member contains the thumb bar position, which is not updated while the user drags the thumb bar.
SIF_RANGE – The nMin and nMax members contain the minimum and maximum values for the scrolling range.
SIF_TRACKPOS – The nTrackPos member contains the current position of the thumb bar while the user is dragging it.

nMin – minimum scrolling position.
nMax – maximum scrolling position.
nPage – Specifies the page size, in device units. This value to determine the size of the proportional thumb bar.
nPos – Specifies the position of the thumb bar.
nTrackPos – Specifies the current thumb bar position while it is being dragged by the user.

For more detailed information on getscrollinfo-https://docs.microsoft.com/en-us/windows/win32/api/winuser/nf-winuser-getscrollinfo


The following short program demonstrates the main window vertical scrollbar by displaying the scroll value within the main window


#include <windows.h>
LRESULT CALLBACK WndProc(HWND, UINT, WPARAM, LPARAM);
int WINAPI WinMain(HINSTANCE hInstance, HINSTANCE hPrevInstance,LPSTR lpCmdLine, int nCmdShow)
{
WNDCLASSEX wc = {0};
MSG msg;
wc.cbSize        = sizeof(WNDCLASSEX);
wc.lpfnWndProc   = WndProc;
wc.hInstance     = hInstance;
wc.hbrBackground = (HBRUSH)(COLOR_WINDOW+1);
wc.lpszClassName = TEXT("myWindowClass");
RegisterClassEx(&wc);
//create window with scrollbar
CreateWindowEx(WS_EX_CLIENTEDGE,TEXT("myWindowClass"),TEXT("Scrollbar demo"),WS_THICKFRAME|WS_OVERLAPPEDWINDOW|  WS_VISIBLE | WS_OVERLAPPEDWINDOW |WS_VSCROLL,CW_USEDEFAULT, CW_USEDEFAULT, 240, 120, NULL, NULL, hInstance, NULL);
while(GetMessage(&msg, NULL, 0, 0) > 0)
{
TranslateMessage(&msg);
DispatchMessage(&msg);
}
return msg.wParam;
}

LRESULT CALLBACK WndProc(HWND hwnd, UINT msg, WPARAM wParam, LPARAM lParam)
{
PAINTSTRUCT Ps;
SCROLLINFO si;    
HDC hdc;
static int yClient;  
int totalwords=100;
static int yPos;
static int rows; 
switch(msg)
{
case WM_PAINT://traps paint message
{
hdc = BeginPaint(hwnd, &Ps);
TCHAR sbv[10]=TEXT("\0");
int count;
int linecount=0;
int startline=GetScrollPos(hwnd,SB_VERT);
int endline=startline+rows;
int strlength=0;
//output line number
for (count=startline; count <endline; count++)
{
strlength=wsprintf(sbv,TEXT("%d"), count+1);
TextOut(hdc,0,linecount,sbv,strlength);
linecount=linecount+15;
}
EndPaint(hwnd, &Ps);
DeleteDC(hdc);
}
break;
//deals with changes in widows sizr
case WM_SIZE: 
yClient = HIWORD (lParam);  // Retrieves the height of the client area. 
rows=yClient/15;//calculate totoal number of text row in client area
SetScrollRange(hwnd, SB_VERT, 0, totalwords-rows, TRUE);//set scrollbar size
InvalidateRect(hwnd,NULL,TRUE) ;//repaint window
break;
case WM_VSCROLL:
{
//Retrieves attributes of scrollbar 
si.cbSize = sizeof (si);
si.fMask  = SIF_ALL;
GetScrollInfo (hwnd, SB_VERT, &si);
//respond to scrollbar messages
switch (LOWORD (wParam))
{
// User clicked the HOME keyboard key.
case SB_TOP:
si.nPos = si.nMin;
break;
// User clicked the END keyboard key.
case SB_BOTTOM:
si.nPos = si.nMax;
break;
// User clicked the top arrow.
case SB_LINEUP:
si.nPos -= 1;
break;
// User clicked the bottom arrow.
case SB_LINEDOWN:
si.nPos += 1;
break;          
// User dragged the scroll box.
case SB_THUMBTRACK:
si.nPos = si.nTrackPos;
break;
default:
break; 
}
// Set the new scollbar position.
si.fMask = SIF_POS;
SetScrollInfo (hwnd, SB_VERT, &si, TRUE);
//redraw window contents by manually sending manually sending WM_PAINT
InvalidateRect(hwnd,NULL,TRUE) ;
}
break;
case WM_CLOSE:
DestroyWindow(hwnd);
break;
case WM_DESTROY:
PostQuitMessage(0);
break;
default:
return DefWindowProc(hwnd, msg, wParam, lParam);
}
return 0;
} 

Child Windows – Adding Controls

A child window or control is a prepacked window that exists inside and is dependent on a parent window.  Controls cut down repetitive development tasks and promote a consistent and recognisable application interface. The child window processes mouse and keyboard messages and notifies the parent window, by way of command messages when the child window’s state has changed. Child controls are created like any other window using the CreatWindowEx() or CreateWindow() function.  Although it’s possible to create user-defined child window controls, Windows includes several predefined standard child window controls using predefined classes created within Windows. This predefined name is used as a class parameter in the CreateWindow call. Windows offers more than 20 types of controls; six, are known as classic controls and are implemented as standard

Edit Control

An edit or textbox control is a rectangular control window that allows the user to enter and edit text. The text in edit controls can be left-justified, right-justified, or centered. Edit controls are set by default to a single line but can be created as multiline. An edit control is limited to about 60 KB of text. If there is a requirement to handle large amounts of text, an enhanced version of the standard edit control known as the rich edit control is available as part of the common control library. The predefined class name for a textbox in the CreatWindow function is “EDIT”

Static Control

Static controls are commonly used as labels for other controls.  The static control cannot be selected, accept input from the keyboard or mouse and do not send WM_COMMAND messages back to the parent window. A static window is created by using “STATIC” as the window class in the CreateWindow function. 

Buttons

A Button is a simple control used to trigger an action. When a button is clicked, it sends a WM_COMMAND message to the parent window.

Push Button- is a rectangular control containing text used to trigger an action by sending an action to the parent window when clicked. The predefined class name used in the Creatwindow function is “BUTTON”

Check Boxes – A checkbox is a small square box which comes contains an associated label that describes the purpose of the checkbox. The specified text within the label will usually appear to the right of the checkbox. Checkboxes function as a toggle switch allowing the user to select and de-select options. Clicking the box once causes a checkmark to appear; clicking it again toggles the checkmark off. Both of these actions send a message to the parent window.  The predefined class name used for a checkbox in the Creatwindow function is “BUTTON” with the dwStyle being set to “BS_CHECKBOX”

Radio Buttons – A radio button is a control element that usually allows the user to choose only one of a predefined set of mutually exclusive options.  The control consists of a small circle and a descriptive label. Radio buttons are arranged in groups of two or more and are mutually exclusive. This means that when the user selects a particular radio button, any previously selected radio button in the same group becomes deselected. Unlike checkboxes, radio buttons do not work as toggles. The predefined class name for a radio button in the Creatwindow function is “BUTTON” with the dwStyle being set to “BS_AUTORADIOBUTTON”

The Scrollbar

scroll bar is an object that allows the user to adjust a particular value or a section of the window or view, by navigating either left and right or up and down. A scroll bar appears as a long bar with a small button at each end. Between these buttons, there is a moveable bar called a thumb. Scrollbars exist in two forms: the standard scroll bar and the scroll bar control. The standard scroll bar is an integral part of a window, whereas the scroll bar control exists as a separate control.

To scroll, the user can click one of the buttons or grab the thumb and drag it.  Unlike the button controls, scroll bar controls do not send WM_COMMAND messages to the parent window. Instead, they send WM_VSCROLL and WM_HSCROLL messages.

The predefined class for the scrollbar is SCROLLBAR. To add a scrollbar to an existing window add the WS_HSCROLL and WS_VSCROLL parameters the dwStyle parameter when creating the window.

The Listbox Class

A listbox displays a list of items displayed as a scrollable list within a rectangle. Users can select or deselect one or more of these items by clicking the appropriate line of text.  The predefined class for the listbox is “LISTBOX”

A Combo Box

A combo box or drop-down list is a combination of listbox and editbox, allowing the user to either type a value directly or select a value from the list.  Combo boxes come in three varieties: simple, drop-down, and drop-down list. The predefined class for the scrollbar is “COMBOBOX”

Menus

In Windows, a menu bar is a horizontal bar most often displayed immediately below the caption bar and usually containing a list of drop-down menu items. These drop-down menus can contain either other menu items or nested submenus. Menu items can be enabled, disabled, greyed and checked or not checked.

Menus can be constructed programmatically or built with a resource editor in some IDEs. CreateMenu(), AppendMenu() and InsertMenu() are the primary API function calls when building menus and maintaining menus at run time –

Create a Menu

To create a menu use the CreateMenu() API function. The menu is initially empty. The prototype of this function is

HMENU CreateMenu();

If the function succeeds, the return value is a handle to the newly created menu. If the function fails, the return value is NULL.

Adding a Menu Item

To add items to the top-level menu, drop-down menu, submenu or context menu use the AppendMenu API function. The prototype is –

BOOL AppendMenu(HMENU hMenu,UINT uFlags,UINT_PTR uIDNewItem,LPCSTR lpNewItem);

where
hMenu – A handle to the menu bar, drop-down menu, submenu, or shortcut menu to be changed.
uFlags -Controls the appearance and behaviour of the new menu item.
uIDNewItem – The identifier of the new menu item or, if the uFlags parameter is set to MF_POPUP, a handle to the drop-down menu or submenu.
lpNewItem -The content of the menu item. Can be one of the following: MF_BITMAP; MF_OWNERDRAW; MF_STRING

If the function succeeds, the return value is nonzero. If the function fails, the return value is zero. 

For further detailed reading 
https://docs.microsoft.com/en-us/windows/win32/api/winuser/nf-winuser-appendmenua

Dynamically Modifying Menus

Modify a Menu

The ModifyMenu function changes an existing menu item. The prototype of this function is –

BOOL ModifyMenu(HMENU hMnu,UINT uPosition,UINT uFlags,UINT uIDNewItem,LPCTSTR lpNewItem);

hMnu – Handle to the menu to be changed.
uPosition – Specifies the menu item to be changed, as determined by the uFlags parameter.
uFlags – Specifies flags that control the interpretation of the uPosition parameter and the content, appearance, and behaviour of the menu item.
uIDNewItem – Specifies either the identifier of the modified menu item or the handle to the drop-down menu or submenu.
lpNewItem – Pointer to the content of the changed menu item.

Returns nonzero if the function is successful; otherwise zero.

For further detailed reading
https://docs.microsoft.com/en-us/windows/win32/api/winuser/nf-winuser-modifymenua

Insert a Menu Item

To insert a new menu item at the specified position in a menu use the IntertMenuItem() API function. The prototype is –

BOOL InsertMenuItem(HMENU hmenu,UINT item,BOOL fByPosition,LPCMENUITEMINFOA lpmi);

hMenu – Handle to the menu where the new menu item will be inserted.
uItem – Identifier or position of the menu item before which to insert the new item.
fByPosition – Value specifying the meaning of uItem. If this parameter is FALSE, the uItem parameter is a menu item identifier. Otherwise, it is a menu item position.
lpmii – Pointer to a MENUITEMINFO structure that contains information about the new menu item.

Returns nonzero if the function is successful; otherwise zero.

For further detailed reading.
https://docs.microsoft.com/en-us/windows/win32/api/winuser/nf-winuser-insertmenuitema

Deleting a Menu

Deletes a menu item and the submenu associated with it, if any. The prototype of this function is –

BOOL DeleteMenu(HMENU hMenu,UINT uPosition, UINT uFlags);

Where
hMenu– Handle to the menu to be changed.
uPosition – Specifies the menu item that is to be deleted
nFlags – Is used to interpret nPosition

Returns nonzero if the function is successful; otherwise zero.

Some Useful Menu-Related Messages 


WM_COMMAND – fires when the user selects an active menu item. The value of the LOWORD(wParam) contains the menu item selected.

WM_INITMENU – fires whenever the user clicks anywhere in the menu bar but before the menu becomes active allowing an application to change the menu before an item is chosen. Windows sends the WM_INITMENU message only once per menu activation. The wParam contains a handle to the menu to be initialised.

For further reading https://docs.microsoft.com/en-us/windows/win32/menurc/wm-initmenu

WM_MENUSELECT –  Sent to a menu’s owner window when the user selects a menu item. The low-order word of wParam specifies the menu item or submenu index while the high-order word of wParam specifies one or more menu flags. The lparam contains a handle to the menu that was clicked.

For further reading https://docs.microsoft.com/en-us/windows/win32/menurc/wm-menuselect

WM_INITMENUPOPUP – Sent when a drop-down menu or submenu is about to become active. This allows an application to modify the menu before it is displayed. The wParam is a handle to the drop-down menu or submenu. The low-order lParam word specifies the zero-based relative position of the menu item while the high-order word indicates whether the drop-down menu is the window menu. If the menu is the window menu, this parameter is TRUE; otherwise, it is FALSE.

For further reading https://docs.microsoft.com/en-us/windows/win32/menurc/wm-initmenupopup

The Popup or Context Menu

A popup or context menu generally appears when the user right-clicks. The term context menu refers to the fact that the options in the menu relate to what was right-clicked. The TrackPopupMenu() function displays a context menu in a specific position on the screen. The popup menu can be loaded from an existing resource or created dynamically with a call to CreatePopupMenu.

The prototype for the TrackPopupMenu is –

BOOL TrackPopupMenu(HMENU hMenu,UINT uFlags,int x,int y,int nReserved,HWND hWnd,const RECT *prcRect);

Where
nFlags – Specifies screen-position and mouse-position flags.
Use one of the following flags to specify how the function positions the shortcut menu horizontally.
TPM_CENTERALIGN – Centers the shortcut menu horizontally relative to the coordinate specified by the x parameter.
TPM_LEFTALIGN – Positions the shortcut menu so its left side is aligned with the coordinate specified by the x parameter.
TPM_RIGHTALIGN – Positions the shortcut menu so its right side is aligned with the coordinate specified by the x parameter.
Use one of the following flags to specify how the function positions the shortcut menu vertically.
TPM_BOTTOMALIGN – Positions the shortcut menu so its bottom side is aligned with the coordinate specified by the y parameter.
TPM_TOPALIGN – Positions the shortcut menu so its top side is aligned with the coordinate specified by the y parameter.
TPM_VCENTERALIGN – Centers the shortcut menu vertically relative to the coordinate specified by the y parameter.
x – Specifies the horizontal position in screen coordinates of the pop-up menu.
y – Specifies the vertical position in screen coordinates of the top of the menu on the screen.
pWnd – Identifies the window that owns the pop-up menu.
lpRect – Ignored.

Returns the result of calling TrackPopupMenu

Example

The code section below creates a window with a top-level menu, a single drop-down menu and two selectable menu items. In addition, the same menu options are available via a “right-click” context menu. Selecting either will produce a message beep.

Working with the Mouse

Windows can handle a mouse with up to three buttons and a mouse wheel. Windows generates mouse messages when the user moves the mouse, presses a mouse button, or scrolls the mouse wheel within either the client area or the non-client area of a window. The non-client area of a window consists of the borders, the title bar, the menu bar, and the window control buttons such as minimize, maximize, and close.

Some Common Client Area Mouse Messages

WM_MOUSEMOVE- Generated when the mouse moves over the client area of a window.
WM_LBUTTONDBLCLK – Left mouse button pressed twice within the double-click time.
WM_LBUTTONDOWN- Left mouse button pressed.
WM_LBUTTONUP – Left mouse button released.
WM_RBUTTONDBLCLK – Right mouse button pressed twice within the double-click time
WM_RBUTTONDOWN – Right mouse button pressed.
WM_RBUTTONUP – Right mouse button released.
WM_MBUTTONDBLCLK – Middle mouse button clicked twice within the double-click time.
WM_MBUTTONDOWN – Middle mouse button pressed.
WM_MBUTTONUP – Middle mouse button released.
WM_SETCURSOR – The mouse cursor needs to change.

When an application receives a mouse message, the lParam value contains the cursor’s x and y position. These coordinates are relative to the upper-left corner of the client area. To retrieve the x and y values, the most common method is to use the GET_X_LPARAM and GET_Y_LPARAM macros.

xPos = GET_X_LPARAM(lParam); yPos = GET_Y_LPARAM(lParam);

The value of wParam contains information about the state of the mouse and keyboard. It may contain any combination of the following values –

MK_LBUTTON – Posted when the user presses the left mouse button
MK_MBUTTON – Posted when the user presses the middle mouse button
MK_RBUTTON – Posted when the user presses the right mouse button
MK_SHIFT – Posted when the user presses the shift button
MK_CONTROL – Posted when the user presses the control button
MK_XBUTTON1 – Posted when the user releases the first or second X button

Example

The following program demonstrates mouse and keyboard messages by responding to mouse clicks and displaying the relevant status information at the associated mouse click position on the screen.


Some Common Non-Client Area Mouse Messages

WM_NCLBUTTONDOWN – Left mouse button pressed.
WM_NCLBUTTONUP – Left mouse button released.
WM_NCLBUTTONDBLCLK – Left mouse button clicked twice within the double-click time
WM_NCMBUTTONDOWN – Middle mouse button pressed.
WM_NCMBUTTONUP – Middle mouse button released.
WM_NCMBUTTONDBLCLK – Middle mouse button clicked twice within the double-click time
WM_NCRBUTTONDOWN – Right mouse button pressed.
WM_NCRBUTTONUP – Right mouse button released.
WM_NCRBUTTONDBLCLK – Right mouse button clicked twice within the double-click time
WM_NCMOUSEMOVE – Generated when the mouse moved over the non-client area of a window
WM_NCHITTEST – Tests what type of object the cursor is over (border, caption, client area, etc.)

The lParam value contains the screen position information. The x and y coordinates of the cursor are stored using the POINTS structure.  These coordinates are relative to the upper-left corner of the screen. Screen coordinates can be converted to client coordinates using the API function ScreenToClient().

Detecting the Non-Client Area with WM_NCHITTEST 

The WM_NCHITTEST message can be used to determine what part of a window the cursor is positioned over, such as the border, caption, or client area. The return value of the DefWindowProc function indicates where in the window’s non-client area the event occurred:

case WM_NCHITTEST: hittest = DefWindowProc(hwnd, message, wParam, lParam); if(HTCLIENT == hittest) { }

A selection of these return codes is shown in the table below. 

HTCAPTION – The title bar.
HTCLOSE- The close button.
HTGROWBOX – The restore button (same as HTSIZE).
HTHSCROLL -The window’s horizontal scroll bar.
HTMENU – The menu bar.
HTREDUCE – The minimize button.
HTSIZE – The restore button (same as HTGROWBOX).
HTSYSMENU – The system menu box.
HTVSCROLL -The window’s vertical scroll bar.
HTZOOM -The maximize button

Example

The following short program demonstrates non-client area messages by responding to mouse clicks within the non-client area. Clicking in the title bar, the restore button, the close button, the maximise button, the Windows border or the system menu will output a relevant message within the client area. To close the window double-click anywhere within the non-client area


The Mouse Wheel

The WM_MOUSEWHEEL message is sent when the mouse wheel is rotated. The lParam value contains the cursor’s x and y coordinates in screen coordinates. These coordinates are relative to the upper-left corner of the screen and can be converted to client-area coordinates using the ScreenToClient function.

The high-order word of wParam indicates the distance the wheel has been rotated, expressed in multiples of 120. A positive value indicates a forward rotation (away from the user), while a negative value indicates a backward rotation (toward the user).

The low-order word of wParam indicates the state of various virtual keys, such as Ctrl or Shift, at the time the message was generated.

fwKeys = LOWORD(wParam); // key flag
szDelta = (short) HIWORD(wParam); // wheel rotation
xPos = (short) LOWORD(lParam); // horizontal position of pointer
yPos = (short) HIWORD(lParam); // vertical position of pointer

Mouse wheel support in Win32 applications was introduced in the late 1990s with the addition of the WM_MOUSEWHEEL message to the Windows API. Although the operating system supported the mouse wheel (beginning with Windows 98), early development environments such as Visual Studio 98 often shipped with older Windows header files that did not define the new constants and macros. As a result, programmers using these older headers sometimes needed to manually define values such as WM_MOUSEWHEEL and WHEEL_DELTA, even though the message itself was fully supported by the operating system.

Windows also supports additional mouse messages for extra mouse buttons that are commonly found on modern mice. These buttons are typically referred to as X buttons. The messages WM_XBUTTONDOWN, WM_XBUTTONUP, and WM_XBUTTONDBLCLK are generated when one of these extra buttons is pressed, released, or double-clicked. The high-order word of wParam identifies which button was used (XBUTTON1 or XBUTTON2), while the low-order word of wParam contains the state of virtual keys such as Ctrl, Shift, or the mouse buttons at the time the message was generated. The lParam value contains the cursor’s x and y coordinates relative to the client area of the window. These messages allow applications to support additional mouse functionality beyond the standard left, right, and middle buttons.

Capturing the Mouse

A window procedure normally receives mouse messages only when the mouse cursor is positioned over the client or non-client area of the window. However, a program may need to receive mouse messages even when the cursor moves outside the window.

For example, if a mouse button is pressed inside a window but the cursor moves outside the window’s client area before the button is released, the window may not receive the button-up event.

To address this situation, Windows allows an application to capture the mouse so that it continues to receive mouse messages even when the cursor moves outside the window. Once the mouse is captured, the window continues to receive mouse messages until the capture is released or another window captures the mouse.

The mouse is captured using the SetCapture function and released with ReleaseCapture. These functions are typically called in the mouse button-down and button-up message handlers.

Changing the Mouse Icon

The API function SetCursor allows an application to change the mouse cursor. The syntax for this function is:

HCURSOR SetCursor(HCURSOR hCursor);

where hCursor is a handle to the cursor. The cursor can be created using the CreateCursor() function or loaded using the LoadCursor() or LoadImage() functions. If this parameter is NULL, the cursor is removed from the screen.

The return value is a handle to the previous cursor, or NULL if there was no previous cursor.

Double Clicks

For a window to receive double-click messages, the window class must be configured to request notification of double-click events. This is done by setting the style member of the WNDCLASS structure to CS_DBLCLKS.

wndclass.style=CS_DBLCLKS;

The left and right button double-click messages are WM_LBUTTONDBLCLK and WM_RBUTTONDBLCLK. The contents of lParam and wParam are the same as those used for the corresponding single-click messages.

To set the double-click interval, use the API function SetDoubleClickTime(UINT interval), and to retrieve the current double-click interval, use the function GetDoubleClickTime().

The double-click interval specifies the maximum time, in milliseconds, that can occur between two consecutive mouse button clicks for them to be interpreted as a double-click.

Keyboard Input

Windows receives keyboard input in the form of messages. A physical key press can generate both a keystroke message and a character. Keystrokes represent the physical key press, while characters represent the display symbols or glyphs generated as a result of that key press. Not every keystroke generates a character.

Each time a key is pressed, a message is sent to the window that currently has input focus. Input focus indicates the component of the graphical user interface that is selected to receive keyboard input. Since most applications contain more than one window, a particular window must have input focus in order to receive these messages.

The window that has input focus receives all keyboard messages until the focus changes to another window.

Keystroke Messages

When a key is pressed, a WM_KEYDOWN or WM_SYSKEYDOWN message is placed in the message queue by Windows. When the key is released, Windows places either a WM_KEYUP or WM_SYSKEYUP message in the message queue.

These keystroke messages indicate the pressed key using a virtual-key code. A virtual-key code is a device-independent integer value that uniquely identifies a key on the keyboard. This virtual-key code is stored in the wParam parameter of the message.

The lParam parameter contains additional information about the keystroke, including the repeat count and key transition state (for example, whether the key is being pressed or released).

For a complete list of virtual-key codes and their symbolic constant names, see:
https://learn.microsoft.com/en-us/windows/win32/inputdev/virtual-key-codes

The WM_SYSKEYDOWN and WM_SYSKEYUP messages are generated when the user presses the F10 key (which activates the menu bar) or holds down the ALT key while pressing another key. These messages can also occur when no window currently has keyboard input focus, in which case the message is sent to the active window.

The WM_SYSKEYDOWN and WM_SYSKEYUP messages are usually processed by the Windows system rather than by application programs. Because improperly handling system keystroke messages can result in unpredictable behavior, the WM_KEYDOWN and WM_KEYUP messages are generally the keyboard messages of most interest to developers.

Character Messages

Character messages are the result of translating keystroke messages into character codes. The most commonly used character message is WM_CHAR. When the WM_CHAR message is sent, the wparam parameter contains the character code of the key pressed and the lparam parameter contains other information such as the repeat count, extended key flag, and transition state.  An application must include the TranslateMessage function in its message loop to retrieve character codes.

Dead Keys

A dead key is a modifier key that does not generate a character but modifies the character generated by the key pressed immediately after it. Dead keys are typically used to attach a specific diacritic to a base letter.

An application will need a WM_DEADCHAR or WM_SYSDEADCHAR message map handler to process dead-key messages.

Retrieving a Key State

The GetKeyState API function retrieves the status of a specified virtual key. The returned status indicates whether the key is up, down, or toggled.

Information about the current state of modifier keys such as Shift and Ctrl is not always included in keyboard messages. The GetKeyState() function allows the developer to determine the state of these keys before deciding on an appropriate course of action.

The syntax for this function is as follows:

SHORT GetAsyncKeyState(int vKey);

vKey – Specifies one of 256 possible virtual-key codes.

If the function succeeds, the return value indicates whether the key was pressed since the last call to GetAsyncKeyState, and whether the key is currently up or down.

Example

The following code segment demonstrates the WM_KEYDOWN AND WM_CHAR message by printing the virtual key code and the associated character to the screen. If no character is associated with the keycode the 2nd line is left blank.

The Device Context

A device context is a Windows data structure that contains information about the drawing attributes of an output device. When an application needs to send data to a screen or printer, it must first obtain a handle to the device context (DC) of that device. Windows then fills the device context structure with the attribute values of the device being written to. The relevant API functions can then use the information in the device context to display output as required. The process of writing to the screen is known as painting.

A window may need to be painted or repainted when it is first created, when it is minimized or maximized, or as the result of some action by the user. In older, pre-Vista versions of Windows, the WM_PAINT message could also be triggered when a window that had been partially covered by another window became visible again. Usually, an application is only responsible for painting the client area. The client area is the rectangular portion of a window inside the border that does not include the window frame, caption, menu, system menu, or scroll bars. The operating system automatically paints the surrounding frame, including the title bar.

System Generated Repaint Requests

Windows does not keep a record of an application window’s contents. If any part of the client area is overwritten, Windows notifies the application by sending a WM_PAINT message to the application window, indicating that the client area needs to be repainted. The region of the application’s client area that needs updating is known as an invalid area. Windows maintains the size and coordinates of this region for each window.

BeginPaint()

The WM_PAINT message is used with the BeginPaint() function to obtain a device context. This function prepares the specified window for painting and fills a PAINTSTRUCT structure with information about the invalidated area. The invalidated area excludes any part of the window outside the update region. The application can then use this information to redraw the window, beginning with the window’s background, which is repainted using the current brush selected in the device context.

Windows continues to place WM_PAINT messages in the message queue while an invalidated area exists. The EndPaint() function must be called after BeginPaint() to validate the client area before leaving the WM_PAINT handler block. Failure to validate the client area results in an endless WM_PAINT loop. EndPaint() marks the end of the painting operation and releases the display device context.

The prototype of the BeginPaint function is as follows-

HDC BeginPaint(HWND hwnd,LPPAINTSTRUCT lpPaint);

Where
hwnd is the handle of the window for which the device context is being obtained
lpPaint is a pointer to a PAINTSTRUCT structure.

If the function is successful, its return value is the device context. If it fails, the return value is NULL.

The prototype of PAINTSTRUCT is as follows –

typedef struct tagPAINTSTRUCT {HDC hdc;BOOL fErase;RECT rcPaint;BOOL fRestore; BOOL fIncUpdate;BYTE rgbReserved[16];} PAINTSTRUCT;

Only 3 parameters are available to the user application, the rest are filled in by windows when the user application calls BeginPaint. The hdc field is the handle to the device context returned from BeginPaint, fErase specifies whether the background needs to be redrawn and rcPaint specifies the upper left and lower right corners of the rectangle in which the ‘painting’ is requested.

The EndPaint() function is required for each call to the BeginPaint function to validate the client after the screen ‘painting’ is complete. It has the following syntax

BOOL EndPaint(HWND hwnd, const PAINTSTRUCT *lpPaint);

Where hwnd is the Handle to the window that has been ‘repainted’ and lpPaint is a Pointer to a PAINTSTRUCT structure. The return value is always nonzero.

Other Device Context-Related API Functions

GetDC()

The GetDC() function retrieves a handle to a display device context for the client area of a specified window or for the entire screen. GetDC() is usually called when an application needs to repaint the screen immediately in response to a user action that does not generate a WM_PAINT message. The GetDC() function allows an application to paint the entire client area of a window rather than only the invalid region.

The prototype for this function is:

HDC GetDC(HWND hWnd);

Where hWnd is a handle to the window whose device context is required. If this value is NULL, GetDC() retrieves the device context for the entire screen. If the function succeeds, the return value is a handle to the device context for the specified window’s client area. If the function fails, the return value is NULL.

GetWindowDC()

Similar to the GetDC() function, the GetWindowDC() function retrieves a device context (DC) for the entire application window, including non-client areas such as the title bar and scroll bars. Because the origin of the device context is the upper-left corner of the window rather than the client area, the application can paint anywhere within the window.

The prototype for this function is:

HDC GetWindowDC(HWND hWnd);

Where hWnd is a handle to the window whose device context is required. If this value is NULL, GetWindowDC() retrieves the device context for the entire screen. If the function succeeds, the return value is a handle to the device context for the specified window. If the function fails, the return value is NULL.

ReleaseDC()

The ReleaseDC() function releases a device context (DC), freeing it for use by other applications after a call to GetDC() or GetWindowDC().

The prototype for this function is:

int ReleaseDC(HWND hWnd,HDC hdc);

Where hWnd is a handle to the window whose device context is to be released, and hdc is the device context to be released. The return value indicates whether the device context was released successfully, with a value of 1 indicating success and 0 indicating failure.

ValidateRect()

Allows an application to validate a Windows region manually. The prototype for this function is

BOOL ValidateRect(HWND hWnd,const RECT *lpRect);

Where
hWnd is a handle to the window.
lpRect is a pointer to a RECT structure that contains the client coordinates of the rectangle to be removed from the update region. If the hWnd parameter is NULL the system invalidates and ‘redraws’ the entire window. If the RECT structure is NULL the entire client area is removed from the update rectangle. If the function is successful, the return value is nonzero.
If the function fails, the return value is zero.

InvalidateRect()

Allows an application to invalidate a Windows region manually and tells Windows to ‘repaint’ that region.

The prototype for this function is

BOOL InvalidateRect(HWND hWnd,const RECT *lpRect,BOOL bErase);

where
hWnd – is a handle to the window that needs to be updated. If this parameter is NULL, the system invalidates and redraws all windows, not just the windows for this application.
lpRect – is a pointer to a RECT structure containing the client coordinates of the update region. If the parameter is NULL, the entire client area is set for update.
bErase – specifies whether the background within the update region is to be erased when the update region is processed. If this parameter is TRUE, the background is erased when the BeginPaint function is called. If this parameter is FALSE, the background remains unchanged.

If the function is successful then the return value is nonzero. If the function fails, the return value is zero.

SaveDC and RestoreDC.

Each time an application requests a device context, its attributes are reset to the system defaults, and the default pen and brush are selected. To avoid this reinitialisation, the current device context state can be saved using the SaveDC() API function and later restored using the RestoreDC() API function.

Example

The following program demonstrates the WM_PAINT message by keeping a running total of client area repaints. Clicking the minimise and maximise icons or resizing the window will generate a repaint request.

Common Elements

WinMain

All Windows programs begin execution with a call to WinMain(). WinMain is the Windows equivalent of the C function main() and serves as the primary entry point for any Win32-based application. It contains the code required to initialise and register the application, create and display its main window, and enter the message retrieval and dispatch loop.

The prototype of this function is as follows

int WINAPI WinMain(HINSTANCE hInstance, HINSTANCE hPrevInstance, PWSTR pCmdLine, int nCmdShow);

The four parameters are:

hInstance – A handle to the current instance of the application. The operating system uses this value to identify the executable (EXE) when it is loaded into memory.

hPrevInstance – Used in 16-bit applications to provide a handle to the previous application instance. In a Win32-based application, this parameter is always NULL and has no meaning.

pCmdLine – A pointer to a null-terminated string used to pass command-line parameters to Windows programs.

nCmdShow – A flag that specifies whether the main application window is minimised, maximised, or shown normally.

The function returns an int value. Although the operating system does not utilise this value, it can convey a status code to another program.

Defining and Registering the Windows Class

The Windows class structure WNDCLASSEX contains information relating to the behaviour and appearance of a window. The syntax of the WNDCLASSEX structure is as follows:

typedef struct _WNDCLASSEX { UINT cbSize; // size of this structure UINT style; // style flags (see below) WNDPROC lpfnWndProc; // function pointer to the windows callback procedure int cbClsExtra; // extra window-class info (usually 0) int cbWndExtra; // extra window info (usually 0) HANDLE hInstance; // the instance of the application HICON hIcon; // the main icon that will represent the application HCURSOR hCursor; // the cursor for the window HBRUSH hbrBackground; // the background brush to paint the window LPCTSTR lpszMenuName; // the name of the menu to attach if any LPCTSTR lpszClassName; // the name of the registered class itself HICON hIconSm; // the handle of the small icon } WNDCLASSEX;

style – Specifies the class style(s). Styles can be combined by using the bitwise OR (|) operator. The style can be any combination of the following:  CS_BYTEALIGNCLIENT, CS_BYTEALIGNWINDOW, CS_CLASSDC, CS_DBLCLKS, CS_GLOBALCLASS, CS_HREDRAW, CS_NOCLOSE, CS_OWNDC, CS_PARENTDC, CS_SAVEBITS, CS_VREDRAW. 

RegisterClassEx – Before a window can be displayed on the screen, it must be registered. RegisterClassEx() takes a single parameter: the address of the WNDCLASS struct. The registered class name is later called in the CreatWindowsEx function.

In addition to the WNDCLASSEX structure, a window can be registered using the deprecated WNDCLASS structure and the associated RegisterClass function. The main difference between the two is that WNDCLASSEX includes a size member and an additional member that specifies a handle to a small icon for the window.

For a more detailed explanation of these styles and options, refer to the following resource:
https://docs.microsoft.com/en-us/windows/win32/api/winuser/ns-winuser-wndclassexw

Windows also provides a standard set of predefined child window classes, which can be used to implement the functionality of common controls.

CreateWindow

A Window is created by a call to the CreateWindowEx() or CreateWindow() function.  CreateWindowEx differs from CreateWindow in that it uses an extended window style. The prototype for this function is 

HWND CreateWindowEx( DWORD dwExStyle, LPCTSTR lpClassName, LPCTSTR lpWindowName, DWORD dwStyle, int x, int y, int nWidth, int nHeight, HWND hwndParent, HMENU hmenu, HANDLE hinst, LPVOID lpvParam )

The parameter description is as follows –  

DWORD dwExStyle – Defines the extended window style. For an in-depth description of extended styles, see:https://docs.microsoft.com/en-gb/windows/win32/winmsg/extended-window-styles
LPCTSTR lpClassName – A pointer to a null-terminated string containing the predefined control class names. The class name can be registered using RegisterClass, or it can be one of the predefined classes used to create child controls.
LPCTSTR lpWindowName – A pointer to a null-terminated string that specifies the window name.
DWORD dwStyle – Indicates the style of window to be created. The style consists of values combined using the | operator. For a full list of styles, see: https://docs.microsoft.com/en-gb/windows/win32/winmsg/window-styles
int x – The horizontal position of the window.
int y – The vertical position of the window.
int nWidth – The width of the window.
int nHeight – The height of the window.
HWND hwndParent – A handle to the parent or owner window. A NULL value is used if there is no parent window.
HMENU hMenu – A handle to the menu, or a child window identifier.
HINSTANCE hInst – A handle to the application instance.
LPVOID lpvParam – A pointer to additional data passed to the window during creation.

The function returns a handle to the new window or NULL if it fails.

Message Loop

A Windows program is event-driven. This means that program flow is determined by a continuous stream of notifications generated by the system or by users, such as a key press, mouse click, or application change. Each of these events is converted into a message. Windows creates a message queue for every running application. The application, in turn, contains a small message loop that retrieves these queued messages and dispatches them back to the window.

Windows, by way of a message handler, then identifies and calls the appropriate window procedure, WndProc(), passing the message as one of its parameters. Each time the application is ready to read a message, it must call the API function GetMessage(). The prototype for the GetMessage function is:

BOOL GetMessage( LPMSG lpMsg, // point to MSG structure containing message information HWND hWnd, // specifies for which window messages will be obtained. To receive all messages directed at the application this value must be null. UINT wMsgFilterMin, // first message UINT wMsgFilterMax // last message );

Inside the message loop, there are two functions

Translate message() – This Windows API call translates virtual key codes into messages.
Dispatch message() – Dispatches message back to windows.

What is a Message?

All messages are 16-bit integers of structure type MSG and have the following format –

typedef struct tagMSG{ HWND hwnd;//Identifies the window whose window procedure receives the message. UINT message;//Specifies the message number. WPARAM wParam;//Specifies additional information about the message. LPARAM lParam;//Specifies additional information about the message. DWORD time; //Specifies the time at which the message was posted. POINT pt; //Specifies screen coordinates of cursor, when the message was posted. } MSG;

SendMessage Function

The SendMessage() API function, used throughout the examples on this site, allows specified messages to be sent to a window by directly calling the window procedure associated with that window. The prototype for the SendMessage function is as follows:

LRESULT SendMessage(HWND hWnd,UINT Msg,WPARAM wParam,LPARAM lParam);

where
HWND hWnd – A handle to the window whose window procedure will receive the message. If this parameter is set to HWND_BROADCAST, the message is sent to all top-level windows in the system, including those that are disabled or invisible.
UINT Msg – The message to be sent. For a full list and description of system-provided messages, see: https://docs.microsoft.com/en-gb/windows/win32/winmsg/about-messages-and-message-queues
WPARAM wParam – Holds additional, message-specific information.
LPARAM lParam – Holds additional, message-specific information.

The return value specifies the result of the message processing and will depend on the message sent.

Windows Procedure

The Windows procedure WndProc() is used by a Windows application to process messages until the application is terminated. Each application window must have a WndProc declaration with the return type LRESULT and the calling convention CALLBACK. In Windows, a callback function is any function that is invoked by the operating system.

Although the system generates hundreds of different messages, an application typically needs to filter and process only a small fraction of them. In our simple window, WndProc calls DefWindowProc() to ensure default processing for messages that the application does not handle. 

The prototype of WndProc is.

LRESULT CALLBACK WindowProc(HWND hwnd,  UINT uMsg,WPARAM wParam, LPARAM lParam );

The four Parameters are-

HWND hwnd – A handle to the window to which the message was sent.
UINT uMsg – Specifies the message.
WPARAM wParam – Specifies additional message-specific information.
LPARAM lParam – Specifies additional message-specific information.

Creating a Simple Window

The simple Windows program below creates a basic window with a system menu icon, a minimise, maximise and a close box. It can be compiled in either C or C++.

A simple window In API


#include <windows.h>
LRESULT CALLBACK WndProc(HWND, UINT, WPARAM, LPARAM);
int WINAPI WinMain(HINSTANCE hInstance, HINSTANCE hPrevInstance, LPSTR lpCmdLine, int nCmdShow)
{
const wchar_t CLASS_NAME[] = L"WindowClass";////in modern C and C++ declare string literals as const
WNDCLASSEXW wc = {0};
MSG msg;

//Registering the Window Class
wc.cbSize = sizeof(WNDCLASSEXW);
wc.style = 0;
wc.lpfnWndProc = WndProc;
wc.cbClsExtra = 0;
wc.cbWndExtra = 0;
wc.hInstance = hInstance;
wc.hIcon = LoadIcon(NULL, IDI_APPLICATION);
wc.hCursor = LoadCursor(NULL, IDC_ARROW);
wc.hbrBackground = GetSysColorBrush(COLOR_WINDOW);
wc.lpszMenuName = NULL;
wc.lpszClassName = CLASS_NAME;
wc.hIconSm = LoadIcon(NULL, IDI_APPLICATION);
RegisterClassExW(&wc);

//Creating the Window
CreateWindowExW(WS_EX_CLIENTEDGE, CLASS_NAME, L"Simple Window", WS_VISIBLE | WS_OVERLAPPEDWINDOW, CW_USEDEFAULT, CW_USEDEFAULT, 340, 220, NULL, NULL, hInstance, NULL);

//The Message Loop
while (GetMessage(&msg, NULL, 0, 0) > 0)
{
TranslateMessage(&msg);
DispatchMessage(&msg);
}
return static_cast<int>(msg.wParam);
}

//WndProc procedure. Application acts on messages
LRESULT CALLBACK WndProc(HWND hwnd, UINT msg, WPARAM wParam, LPARAM lParam)
{
switch (msg)
{
case WM_CLOSE:
DestroyWindow(hwnd);
break;
case WM_DESTROY:
PostQuitMessage(0);
break;
default:
return DefWindowProcW(hwnd, msg, wParam, lParam);
}
return 0;
}

Line 1 – All Windows programs must include the header file <windows.h>. This contains declarations for all of the functions in the Windows API, all the common macros used by Windows programmers, and all the data types used by the various functions and subsystems.
Line 2 – Function declaration for CALLBACK function WndProc().
Line 3 – WinMain() function. Marks the program entry point.
Line 6 – Declares the wc structure variable that defines the Window’s class.
Line 7 – Declares the msg structure variable for holding Windows messages.
Lines 10 to 21 – Defines the Window’s class
Line 22 – Registers the Windows class using the function RegisterClassEx().
Line 25 – Once a Window has been defined and registered it is created using the API function CreateWindowEx().
Lines 28 to 34 – The final part of WinMain is the message loop. The purpose of the message loop is to receive and process messages sent from Windows. Once the message loop terminates the value of msg.wParam is returned to Windows.
Line 37 to 51 – The WndProc() procedure is used by Windows to pass messages to an application. In this instance, only the WM_DESTROY & WM_CLOSE message is explicitly processed.

Note – Although NULL is still valid, it is no longer recommended in modern C++. nullptr was introduced with C++11 because it is a true null pointer constant; however, it is only supported in Visual Studio versions that include C++11 features.

Overview

The Windows API (Application Programming Interface) is used in the development of desktop and server applications and is commonly referred to as Win32. The Win32 interface comprises an extensive collection of system-defined functions and other programming elements that provide access to the operating system. These API functions are contained in Dynamic Link Libraries (DLLs), which a program must access when it is executed. All Windows programs must interact with the Windows API, regardless of the programming language used. The API is implemented primarily in C and C++. The Win32 API is the platform of choice for GUI applications that require the highest level of performance and direct access to system hardware.

The Microsoft Foundation Class (MFC) library consists of a hierarchical structure of classes, functions, data types, and constants designed to simplify the creation of applications for Microsoft Windows.

MFC was introduced in 1992 and was developed to simplify the process of Windows application development. The MFC library sits on top of, or wraps, portions of the Windows API in C++ classes, meaning that direct Windows API calls are rarely required. Developers can create objects from these MFC classes and call member functions belonging to those objects. The main advantage of this approach is the ease and speed of application development, achieved by providing pre-written code. MFC also offers the benefits normally associated with programming in C++.

The .NET Framework is a more recent software framework developed by Microsoft for creating Windows applications. It comprises an extensive class library and, in contrast to MFC, supports multiple programming languages such as Visual Basic and C#. Programs written for the .NET Framework are executed in a virtual software environment, rather than directly on hardware, known as the Common Language Runtime (CLR). The CLR provides managed execution by transforming source code into an intermediate bytecode known as Common Intermediate Language (CIL), and it performs services such as garbage collection and memory management. In addition to language interoperability, applications built on the .NET Framework can run on any compatible Windows platform.

Although the Windows API is built around the C language, it can be utilized by any language or compiler capable of handling the required low-level data structures and calling conventions for function calls and callbacks.

Compiler Support: The Windows Software Development Kit (SDK) provides the tools, compilers, headers, and libraries that developers need to create applications that run on Microsoft Windows. To develop software that accesses the Windows API, a compiler must be capable of utilizing Microsoft-specific libraries

email

Alternative sites for the javascript-phobic

https://joomla.cybernaught.net/
https://simplest.cybernaught.net/
https://cybernought.infy.uk/